Configuring ItemPick for bin picking
This tutorial shows how to configure the ItemPick module to work in a bin-picking application. More specifically, the bin (or so-called Load Carrier) is configured and detected in the scene, in order to compute grasps only for items inside the bin itself.
The tutorial covers all the steps from configuration of a load carrier up to getting grasps for items inside the load carrier. For this, we will call the ItemPick services using the rc_visard’s REST-API interface. This can be done in Swagger UI, in command lines or scripts using curl, and programmatically using a client library (e.g. from a robot controller). Here we focus on the first two options.
Before we start
In order to go through this tutorial, the following prerequisites should be met:
The rc_visard is properly configured:
- The rc_visard is running the latest firmware (version 24.10) and the rc_visard’s license includes the ItemPick module. This can be verified on the page of the Web GUI.
The previous tutorial Getting started with ItemPick has been completed.
A load carrier is available and placed in the field of view of the camera
Setting up the scene
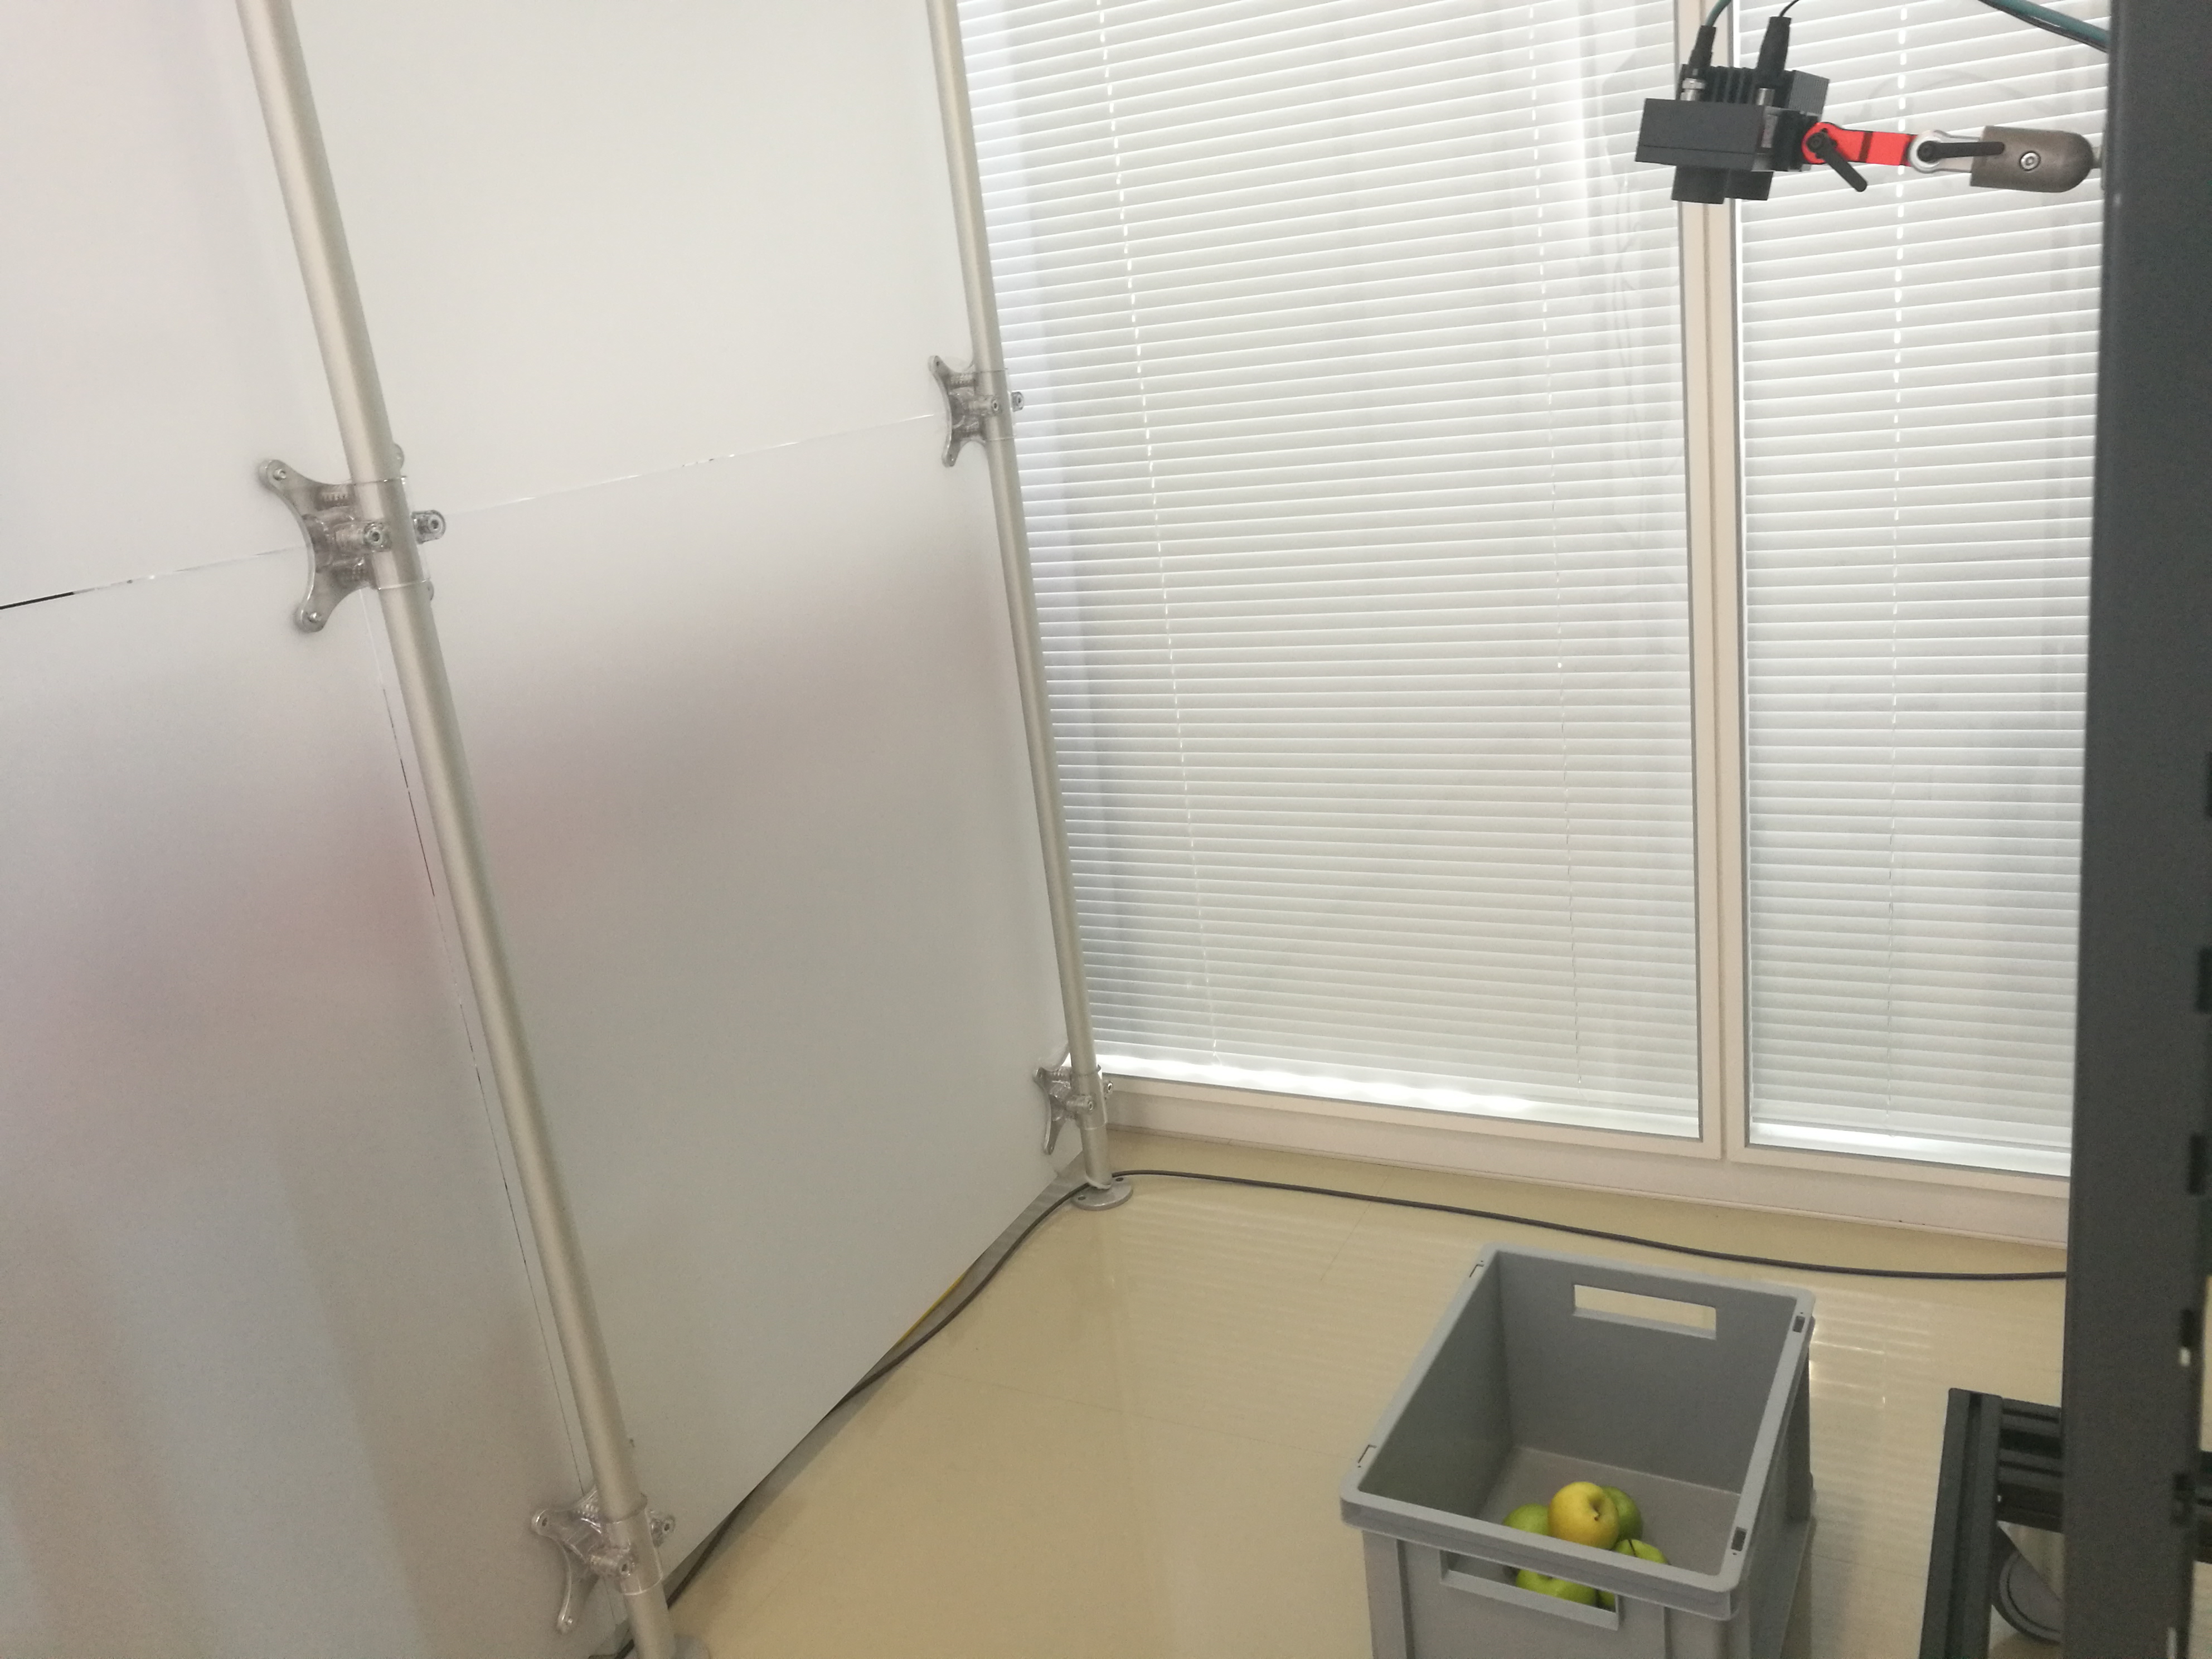
The load carrier should be placed in the field of view of the sensor. Optimally, the sensor should have a clear view onto all objects in the bin without any occlusion by its walls – as shown in the sample setup below.

Fig. 22 Sample setup. The rc_visard 160 is mounted on static support above the load carrier, approximately 1.15 m away from the bin.
The placement should also ensure that the rim of of the load carrier is visible in the depth image. Small occlusions of the rim are acceptable, as long as all edges are at least partially visible. If this is not the case, one can follow the recommendations for tuning camera and image parameters.
Configuring the load carrier
The configuration of the load carrier is described in detail in Configuring a load carrier.
Before proceeding to the next steps, it is important to verify that the load carrier can be detected in the scene, as described in Detecting the load carrier.
Computing grasps inside a load carrier
Once the load carrier is configured and detectable in the scene, ItemPick can be used to compute grasps only for objects that are inside the bin.
To this purpose, the additional argument load_carrier_id should be added to the request to
the REST-API for the compute_grasps service. As explained before, this is also possible in
the Try Out section of the Web GUI’s page.
Request to the REST-API for getting grasps inside my-load-carrier1
To trigger the
compute_graspservice via the REST-API, one needs to send a PUT request to the URLhttp://<rc-visard-ip>/api/v2/pipelines/0/nodes/rc_itempick/services/compute_grasp, where<rc-visard-ip>should be replaced by the actual IP of the rc_visard.The PUT body should include the following data, in JSON:
{
  "args": {
    "pose_frame": "camera",
    "load_carrier_id": "my-load-carrier1",
    "suction_surface_length": 0.02,
    "suction_surface_width": 0.02
  }
}
The Swagger UI can be reached at
http://<rc-visard-ip>/api, where<rc-visard-ip>is the actual IP of the rc_visard.Under pipeline nodes, select
PUT /pipelines/{pipeline}/nodes/{node}/services/{service}The following values are required to fill the request to the REST-API:
node
rc_itempickservice
compute_grasps
- service args
The following command assumes that the variable
RC_VISARD_IPis set to the actual IP of the rc_visard (e.g.RC_VISARD_IP=10.0.2.90).curl -X PUT "http://$RC_VISARD_IP/api/v2/pipelines/0/nodes/rc_itempick/services/compute_grasps" -H "accept: application/json" -H "Content-Type: application/json" -d \ "{ \ \"args\": { \ \"pose_frame\": \"camera\", \ \"load_carrier_id\": \"my-load-carrier1\", \ \"suction_surface_length\": 0.02, \ \"suction_surface_width\": 0.02 \ } \ }"The following command assumes that the variable
RC_VISARD_IPis set to the actual IP of the rc_visard (e.g.set RC_VISARD_IP=10.0.2.90) and the curl command is in the path.curl.exe -X PUT "http://%RC_VISARD_IP%/api/v2/pipelines/0/nodes/rc_itempick/services/compute_grasps" -H "accept: application/json" -H "Content-Type: application/json" -d ^ "{ ^ \"args\": { ^ \"pose_frame\": \"camera\", ^ \"load_carrier_id\": \"my-load-carrier1\", ^ \"suction_surface_length\": 0.02, ^ \"suction_surface_width\": 0.02 ^ } ^ }"The following command assumes that the variable
RC_VISARD_IPis set to the actual IP of the rc_visard (e.g.$RC_VISARD_IP="10.0.2.90").Invoke-RestMethod "http://$RC_VISARD_IP/api/v2/pipelines/0/nodes/rc_itempick/services/compute_grasps" -ContentType 'application/json' -Method Put -Body ' { "args": { "pose_frame": "camera", "load_carrier_id": "my-load-carrier1", "suction_surface_length": 0.02, "suction_surface_width": 0.02 } }' | ConvertTo-Json -Depth 6
Detection results – no matter whether triggered via Web GUI or REST-API – are visualized in the Web GUI’s page.
Note
All points that are not colored in the load carrier visualization image are not used for grasp computation. This can happen if the depth image includes missing data or if the items stick out of the bin by more than 10 cm.
Computing collision free grasps
The Getting started with CollisionCheck tutorial shows how to integrate ItemPick with the CollisionCheck module. When the collision checking is enabled, all detected grasp points are checked for collisions between the gripper geometry and the load carrier.
Note
The x axis of a grasp computed by ItemPick corresponds to the longest axis of the grasp ellipse. When configuring a gripper in the CollisionCheck module, the x axis of the gripper should be set along the longest gripper elongation, in order to match the orientation of the computed grasps.
Request to the REST-API for getting collision free grasps inside my-load-carrier1 with gripper my-gripper
To trigger the
compute_graspservice via the REST-API, one needs to send a PUT request to the URLhttp://<rc-visard-ip>/api/v2/pipelines/0/nodes/rc_itempick/services/compute_grasp, where<rc-visard-ip>should be replaced by the actual IP of the rc_visard.The PUT body should include the following data, in JSON:
{
  "args": {
    "pose_frame": "camera",
    "load_carrier_id": "my-load-carrier1",
    "suction_surface_length": 0.02,
    "suction_surface_width": 0.02,
    "collision_detection": {
      "gripper_id": "my-gripper"
    }
  }
}
The Swagger UI can be reached at
http://<rc-visard-ip>/api, where<rc-visard-ip>is the actual IP of the rc_visard.Under pipeline nodes, select
PUT /pipelines/{pipeline}/nodes/{node}/services/{service}The following values are required to fill the request to the REST-API:
node
rc_itempickservice
compute_grasps
- service args
The following command assumes that the variable
RC_VISARD_IPis set to the actual IP of the rc_visard (e.g.RC_VISARD_IP=10.0.2.90).curl -X PUT "http://$RC_VISARD_IP/api/v2/pipelines/0/nodes/rc_itempick/services/compute_grasps" -H "accept: application/json" -H "Content-Type: application/json" -d \ "{ \ \"args\": { \ \"pose_frame\": \"camera\", \ \"load_carrier_id\": \"my-load-carrier1\", \ \"suction_surface_length\": 0.02, \ \"suction_surface_width\": 0.02, \ \"collision_detection\": { \ \"gripper_id\": \"my-gripper\" \ } \ } \ }"The following command assumes that the variable
RC_VISARD_IPis set to the actual IP of the rc_visard (e.g.set RC_VISARD_IP=10.0.2.90) and the curl command is in the path.curl.exe -X PUT "http://%RC_VISARD_IP%/api/v2/pipelines/0/nodes/rc_itempick/services/compute_grasps" -H "accept: application/json" -H "Content-Type: application/json" -d ^ "{ ^ \"args\": { ^ \"pose_frame\": \"camera\", ^ \"load_carrier_id\": \"my-load-carrier1\", ^ \"suction_surface_length\": 0.02, ^ \"suction_surface_width\": 0.02, ^ \"collision_detection\": { ^ \"gripper_id\": \"my-gripper\" ^ } ^ } ^ }"The following command assumes that the variable
RC_VISARD_IPis set to the actual IP of the rc_visard (e.g.$RC_VISARD_IP="10.0.2.90").Invoke-RestMethod "http://$RC_VISARD_IP/api/v2/pipelines/0/nodes/rc_itempick/services/compute_grasps" -ContentType 'application/json' -Method Put -Body ' { "args": { "pose_frame": "camera", "load_carrier_id": "my-load-carrier1", "suction_surface_length": 0.02, "suction_surface_width": 0.02, "collision_detection": { "gripper_id": "my-gripper" } } }' | ConvertTo-Json -Depth 6
Computing grasps inside a compartment in the load carrier
In some cases it is desirable to select a compartment inside the load carrier and only get
grasps for items inside this compartment. The compute_grasps service includes an
optional argument load_carrier_compartment that can be used to this purpose.
Note
The load_carrier_compartment argument cannot be specified in the Try Out section of
Web GUI’s page.
The compartment is a box whose pose is defined with respect to the load carrier reference frame.
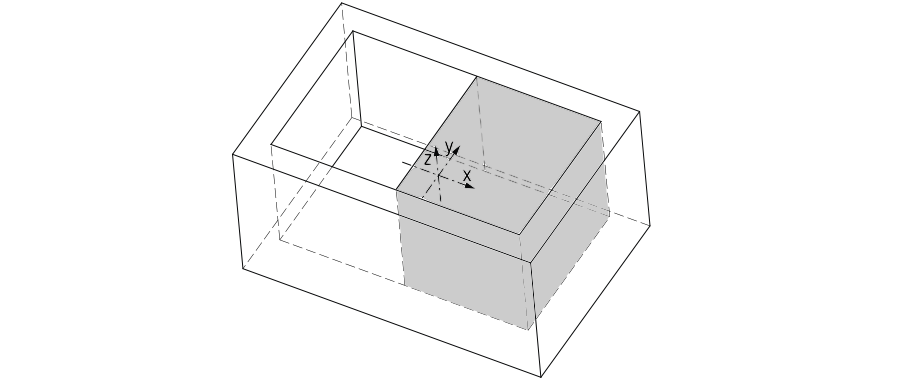
In this section we show how to select the compartment in Fig. 23.

Fig. 23 Sample compartment inside a load carrier. The coordinate system shown in the image is the load carrier reference frame.
The compartment box dimensions are computed from the load carrier inner dimensions:
The load carrier reference frame is located at the center of the load carrier outer box. To move from the load carrier reference frame to the compartment center, the following translation needs to be applied:
Since the compartment volume is intersected with the load carrier inner volume, the box \(z\) dimension can also be set to the load carrier outer dimension, without applying any translation along \(z\).
The code below shows how to place a compute_grasps request for items inside this compartment of
my-load-carrier1.
To trigger the compute_grasp service via the REST-API, one needs to send
a PUT request to the URL
http://<rc-visard-ip>/api/v2/pipelines/0/nodes/rc_itempick/services/compute_grasp,
where <rc-visard-ip> should be replaced by the actual IP of the rc_visard.
The PUT body should include the following data, in JSON:
{
  "args": {
    "pose_frame": "camera",
    "load_carrier_id": "my-load-carrier1",
    "load_carrier_compartment": {
      "box": {
        "x": 0.285,
        "y": 0.37,
        "z": 0.22
      },
      "pose": {
        "position": {
          "x": 0.1425,
          "y": 0,
          "z": 0
        },
        "orientation": {
          "x": 0,
          "y": 0,
          "z": 0,
          "w": 1
        }
      }
    },
    "suction_surface_length": 0.02,
    "suction_surface_width": 0.02
  }
}
The Swagger UI can be reached at
http://<rc-visard-ip>/api, where<rc-visard-ip>is the actual IP of the rc_visard.Under pipeline nodes, select
PUT /pipelines/{pipeline}/nodes/{node}/services/{service}The following values are required to fill the request to the REST-API:
node
rc_itempickservice
compute_grasps- service args
{
  "args": {
    "pose_frame": "camera",
    "load_carrier_id": "my-load-carrier1",
    "load_carrier_compartment": {
      "box": {
        "x": 0.285,
        "y": 0.37,
        "z": 0.22
      },
      "pose": {
        "position": {
          "x": 0.1425,
          "y": 0,
          "z": 0
        },
        "orientation": {
          "x": 0,
          "y": 0,
          "z": 0,
          "w": 1
        }
      }
    },
    "suction_surface_length": 0.02,
    "suction_surface_width": 0.02
  }
}
The following command assumes that the variable RC_VISARD_IP is set to the actual IP of the
rc_visard (e.g. RC_VISARD_IP=10.0.2.90).
curl -X PUT "http://$RC_VISARD_IP/api/v2/pipelines/0/nodes/rc_itempick/services/compute_grasps" -H  "accept: application/json" -H  "Content-Type: application/json" -d \
"{ \
    \"args\": { \
        \"pose_frame\": \"camera\", \
        \"load_carrier_id\": \"my-load-carrier1\", \
        \"load_carrier_compartment\": { \
          \"box\": { \
            \"x\": 0.285, \
            \"y\": 0.37, \
            \"z\": 0.22 \
          }, \
          \"pose\": { \
            \"position\": { \
              \"x\": 0.1425, \
              \"y\": 0, \
              \"z\": 0 \
            }, \
            \"orientation\": { \
              \"x\": 0, \
              \"y\": 0, \
              \"z\": 0, \
              \"w\": 1 \
            } \
          } \
        }, \
        \"suction_surface_length\": 0.02, \
        \"suction_surface_width\": 0.02 \
    } \
}"
The following command assumes that the variable RC_VISARD_IP is set to the actual IP of the
rc_visard (e.g. set RC_VISARD_IP=10.0.2.90) and the curl command is in the path.
curl.exe -X PUT "http://%RC_VISARD_IP%/api/v2/pipelines/0/nodes/rc_itempick/services/compute_grasps" -H  "accept: application/json" -H  "Content-Type: application/json" -d ^
"{ ^
    \"args\": { ^
        \"pose_frame\": \"camera\", ^
        \"load_carrier_id\": \"my-load-carrier1\", ^
        \"load_carrier_compartment\": { ^
          \"box\": { ^
            \"x\": 0.285, ^
            \"y\": 0.37, ^
            \"z\": 0.22 ^
          }, ^
          \"pose\": { ^
            \"position\": { ^
              \"x\": 0.1425, ^
              \"y\": 0, ^
              \"z\": 0 ^
            }, ^
            \"orientation\": { ^
              \"x\": 0, ^
              \"y\": 0, ^
              \"z\": 0, ^
              \"w\": 1 ^
            } ^
          } ^
        }, ^
        \"suction_surface_length\": 0.02, ^
        \"suction_surface_width\": 0.02 ^
    } ^
}"
The following command assumes that the variable RC_VISARD_IP is set to the actual IP of the
rc_visard (e.g. $RC_VISARD_IP="10.0.2.90").
Invoke-RestMethod "http://$RC_VISARD_IP/api/v2/pipelines/0/nodes/rc_itempick/services/compute_grasps" -ContentType 'application/json' -Method Put -Body '
{
  "args": {
    "pose_frame": "camera",
    "load_carrier_id": "my-load-carrier1",
    "load_carrier_compartment": {
      "box": {
        "x": 0.285,
        "y": 0.37,
        "z": 0.22
      },
      "pose": {
        "position": {
          "x": 0.1425,
          "y": 0,
          "z": 0
        },
        "orientation": {
          "x": 0,
          "y": 0,
          "z": 0,
          "w": 1
        }
      }
    },
    "suction_surface_length": 0.02,
    "suction_surface_width": 0.02
  }
}' | ConvertTo-Json -Depth 6
Troubleshooting
- The load carrier rim is not visible in the depth image
- The load carrier is not detected or not detected robustly
- The load carrier is deformed or deformable
- The load carrier is not on a horizontal surface
- The load carrier floor is detected as load carrier content
- Objects on the load carrier floor are not detected as load carrier content