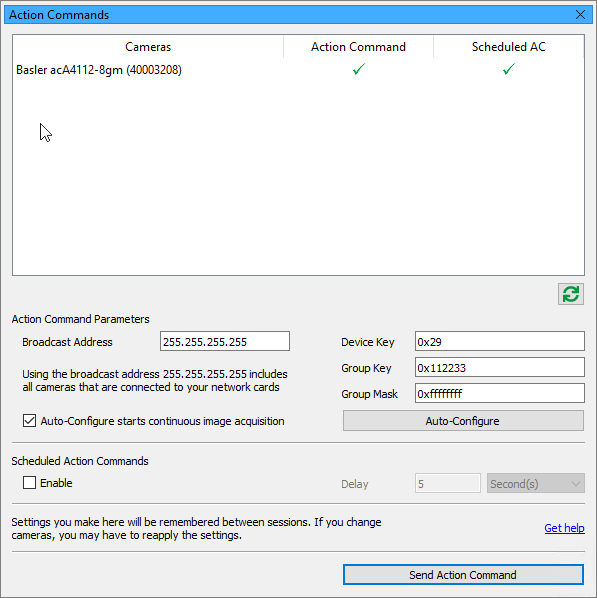
Action Commands (pylon Viewer)#
This feature complements the Action Commands and Scheduled Action Commands camera features. It offers novice as well as expert users an easy way to experiment with sending and scheduling action commands. This feature is only available on certain GigE camera models.
Info
This topic explains how to send and schedule action commands using the pylon Viewer. For an in-depth description of action commands, read the Action Commands and Scheduled Action Commands camera feature topics.
How It Works#
Using this feature you can quickly configure several cameras at once to receive action commands.
The first step is to complete the action command parameter information. You can do this manually or use the Auto-Configure option to let the pylon Viewer do the configuration for you. Clicking Auto-Configure will also enable action commands on the camera and configure the camera to capture one image if it receives an action command.
This makes the Action Commands feature in the pylon Viewer a useful tool to familiarize yourself with the Action Commands camera feature and helps you to implement it in your application.
Working with Action Commands#
To open or close the Action Commands pane, click Window > Action Commands.

The table at the top of the pane lists all open cameras that are connected to your computer and support the action commands feature. If no cameras appear in the list, check in the Devices pane whether connected cameras are open and whether they support the feature. If you add or remove any open cameras in the Devices pane that support action commands, this will immediately be reflected in the Action Commands pane.
In the Action Command Parameters area, you can manually enter the required parameters or choose to have them configured automatically. The parameter entries will remain the same even if you close the pane, but they will not be automatically written to the camera. To write the settings to the camera, click Auto-Configure. The settings apply until you disconnect the camera.
Broadcast Address: This parameter tells the computer the destination of the action command. By default, it is set to 255.255.255.255. This will include all cameras connected to your computer. If you want to limit the number of cameras that will receive the action command, you can specify a single subnet or even an individual camera.
The following three parameters configure the camera. This means that you will overwrite the current settings in the camera if you had configured them previously. Use 32-bit hexadecimal notation for all of them.
- Device Key: This parameter is required to authorize the execution of an action command on the camera.
- Group Key: This parameter is used to define a group of cameras on which an action command is to be executed.
- Group Mask: This parameter allows you to filter out a sub-group of cameras from the group defined by the Group Key parameter.
For more information about these parameters, see the Action Commands feature topic.
Auto-Configure starts continuous image acquisition:When this option is selected, the following applies:
- When you click Auto-Configure, an empty image window tab opens in the image display area.
- When you click Send Action Command, the camera captures one image.
Auto-Configure: When you click this, the pylon Viewer automatically populates the Device Key, Group Key, and Group Mask fields and writes these values to the camera. If you have entered any of these values manually, you also need to click Auto-Configure because that is the only way to write them to the camera. If you have selected the Auto-Configure starts continuous image acquisition option, an image window tab opens in the image display area.
In the Scheduled Action Commands area, you can specify a delay with which to send an action command.
Enable: If you select this option, you can specify a delay.
Info
If you select Enable, the action command will only be sent to cameras that support the Scheduled Action Commands feature.
Delay: In this field, you can enter the desired delay.
When you click Send Action Command, the action command is sent to the specified cameras. Messages about the result will be displayed in the Message Log pane.