Bandwidth Manager#
The Bandwidth Manager is only available in the Windows and Linux version of the pylon Viewer. You can open the Bandwidth Manager via the Tools menu or by right-clicking a camera in the Devices pane.
Info
The Bandwidth Manager supports 1GigE, 5GigE, and 10GigE network adapters. It can determine the bandwidth available and distribute it between the cameras accordingly.
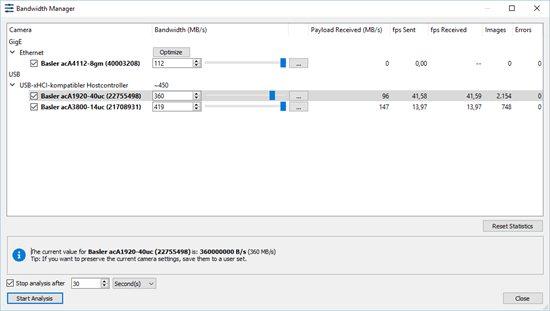
When connecting more than one camera to a single computer, performance can become an issue as the cameras compete against each other for the available bandwidth. To avoid such conflicts, use the Bandwidth Manager. It shows you the following information at a glance:
- USB 3.0 host controller and GigE network adapters installed on your system and the cameras connected to them
- Total bandwidth available (approximately) per USB 3.0 host controller
- Amount of data sent by the camera and received by the computer
- Frames per second (fps) sent by the camera and received by the computer
- Total number of images taken
- Number of transmission errors, i.e., incomplete and skipped images
Based on this information, you can use the Bandwidth Manager to optimize the bandwidth consumption of the cameras connected.
Overview of the Bandwidth Manager#
The Bandwidth Manager dialog lists all USB 3.0 host controllers and GigE network adapters in your computer as well as the cameras connected to each of them. It allows you to allocate a share of the total bandwidth available on the USB 3.0 host controller or network adapter to each camera. This way, you can allocate only so much bandwidth to a camera as it actually needs, thus freeing up resources for other devices.
USB 3.0 cameras: The Bandwidth (MB/s) column also lists how much bandwidth is available on the USB 3.0 host controller to which the cameras are connected. This is an approximate value of the maximum bandwidth available.
GigE cameras: There is an Optimize button for each network adapter. You can click this button to optimize the bandwidth of all selected cameras on this network adapter. You have to select at least one camera for the button to become available.
If you have GigE cameras connected to your computer and open the Bandwidth Manager for the first time, a dialog opens that allows you to optimize all GigE cameras in a single step.
The optimization involves adjusting the Packet Size and Inter-Packet Delay settings. If more than one camera is connected to a network adapter, e.g., via a switch, the available bandwidth is shared across all selected cameras.
If you want to change camera settings yourself, go to the Features - All pane. Note that there are several camera settings that influence the bandwidth consumption, e.g., size of the ROI, pixel format etc.

Optimizing Bandwidth Consumption#
To optimize the performance of your system, start by analyzing the current situation. Once you have an overview, you can fine-tune bandwidth consumption. You can change the bandwidth allocated to each camera on the fly, making it really easy to find the perfect balance between several devices.
To optimize bandwidth consumption:
- Stop continuous image acquisition as well as any recordings on the cameras you want to analyze.
- Open the Bandwidth Manager.
- Select the cameras whose bandwidth you want to analyze.
-
Click Start Analysis.
The columns to the right of the camera get populated with data. In the Images column, you can see the total number of images taken. If there are any images that haven't been transmitted completely or have been skipped entirely, they are listed in the Errors column.
While the analysis is running, you can change the bandwidth available to a certain camera by using the spin box or the slider next to it. You will immediately see the effect of your changes in the data displayed.Info
The bandwidth value is the upper limit available to a camera, which it can't exceed. Therefore, if the camera is not utilizing the full amount of bandwidth, changing the bandwidth will have no visible effects. Only if you lower it so much that the camera can't achieve its frame rate anymore, will you see how the values for Payload Received (MB/s) drop. Note that the payload value is usually lower than the available bandwidth because any overhead sent at the same time is not included.
-
Once you are happy with the results, click Stop Analysis.
The Bandwidth Manager dialog will display the current bandwidth for the selected camera. You can take a note of it for use in other applications.
Instead of stopping the analysis manually, you can select the Stop analysis after option and specify a period of time after which the analysis is stopped automatically. This is useful if you want to gather data over a longer period of time.Info
In the Bandwidth Manager dialog, the bandwidth is given in MB/s for improved readability. Depending on your camera, this corresponds to the Device Link Throughput Limit value in the Device Control category or the Device Current Throughput value in the Device Transport Layer category. Both these values are given in B/s.
-
Optional: Save the current camera settings to a user set to preserve them. Otherwise, if you disconnect the cameras, you will have to repeat the bandwidth configuration.