Assigning a Temporary IP Address to a Camera#
Once a temporary IP address has been assigned to a camera, the camera will retain and use the temporary IP address until you power off the camera and power it back on or assign a different IP address to the camera.
Assigning a Temporary IP Address to Older Cameras#
If the current IP address configuration of older cameras is not compatible with the IP address configuration of the port or network adapter to which the camera is connected, you have to assign a temporary IP address using the pylon IP Configurator.
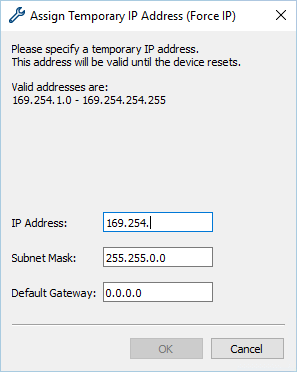
If a temporary IP address is necessary, the IP Configurator will automatically open the Assign Temporary IP Address (Force IP) dialog.

The Assign Temporary IP Address (Force IP) dialog contains the fields IP Address, Subnet Mask, and Default Gateway. It also displays valid IP address ranges. Depending on the subnet that the camera is in, a partial IP address has already been entered in the IP Address field. The fields Subnet Mask and Default Gateway have also been populated with valid information already. This helps to avoid misconfiguring the new temporary IP address.
To assign a temporary IP address to older cameras:
- In the Assign Temporary IP Address (Force IP) dialog, complete the IP address in the IP Address field with a value from the range of valid IP addresses.
- If desired, change the value in the Subnet Mask field.
- If desired, change the value in the Default Gateway field.
- Click OK.
The IP Configurator will save your changes. This takes a few seconds. When the IP Configurator has finished saving, the information in the top pane and the lower central area will have been updated automatically with the new IP address.
Assigning a Temporary IP Address to Older or Newer Cameras#
Another situation where you might want to assign a temporary IP address to a camera would be if you temporarily moved the camera from the computer to which it is normally connected to another computer in a different subnet. This can be necessary from time to time regardless of whether you have a newer or an older camera model.
To assign a temporary IP address to older or newer cameras:
- Open the Assign Temporary IP Address (Force IP) dialog by right-clicking the camera whose IP configuration you want to change.
-
Click Assign Temporary IP Address.

-
Follow the steps described under Assigning a Temporary IP Address to Older Cameras.