Camera vTool#
Download the pylon Software Suite to use the Camera vTool.
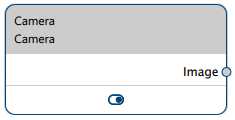
Assigning Cameras#
The Camera vTool randomly allocates an available camera if you haven't defined any specific camera properties. In single-camera designs, this allows you to get up and running quickly.
If you want to assign a specific camera to a Camera vTool in multi-camera designs, read the following sections.
Using the Camera vTool Dialog#
Basler recommends using the Camera vTool dialog to assign a camera to a Camera vTool.
To do so:
- In the Recipe Management pane in the vTool Settings area, click Open Settings or double-click the vTool.
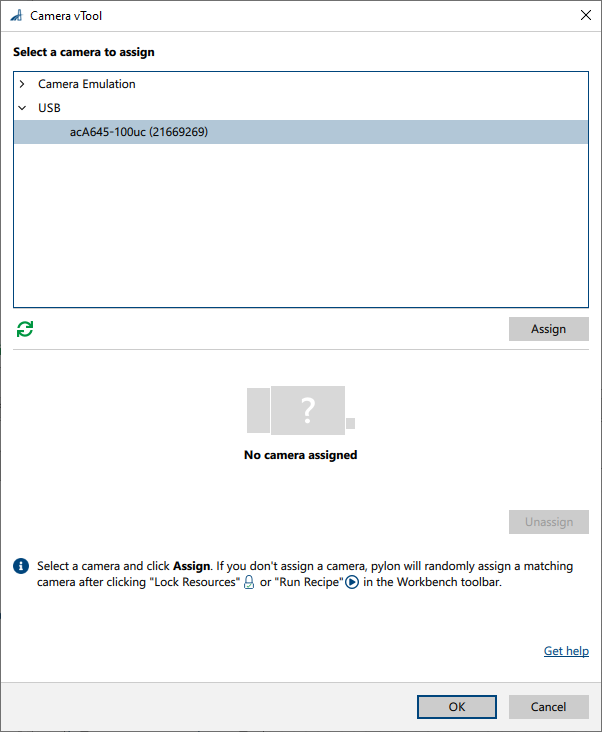
- Select the camera you want to assign and click Assign.
A green checkmark appears next to the camera name. This indicates that the camera is now assigned to the vTool: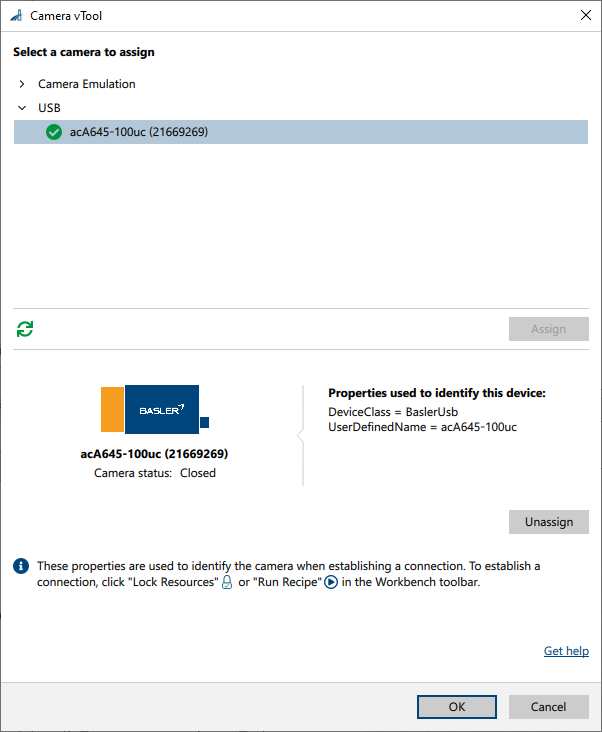
Also, the dialog shows which properties were used to identify the device. In rare cases, you may need to edit these properties. To do so, use the Features pane.
Using the Features Pane#
You can also use the Features pane to assign a camera to a Camera vTool.
This is only necessary in rare use cases, e.g., if you want to view or change the camera assignment without having the physical camera connected to your computer.
To assign a specific camera using the Features pane:
- Select the Camera vTool in the Workbench.
- Open the Features - All pane.
- List available cameras by clicking vTool > Device Enumeration Control > Device List Update > Execute.
- Browse the available cameras using the Device Selector parameter.
This allows you to review certain information about the individual cameras to help you pick the desired camera. - When you have identified the desired camera, click Device Choose > Execute to assign that particular camera to the Camera vTool.
-
To specify further device properties that the camera that you want to assign has to match, use the Device Property * parameters in the vTool > Device Enumeration Control group.
Info
More information on device information properties is available in the documentation of the CDeviceInfo class and the Pylon/Key namespace of the pylon C++ API. This gives you fine-grained control of the camera selection and ensures that the same recipe can be run on multiple computers with the correct cameras.
Basler recommends using the DeviceClass and UserDefinedName properties if multiple cameras are attached to a system. You need to set the camera's DeviceUserID parameter first before you can select a camera by using the UserDefinedName property.
Note that USB cameras need to be reset or power-cycled to be able to use a newly set DeviceUserID.
Configuring Cameras#
After assigning a camera to a Camera vTool, click the Lock Resources button in the Workbench toolbar to establish an exclusive connection to the camera device assigned.

You can now configure the camera in the Features - All pane.
Saving Camera Settings in a Recipe#
Camera settings aren't saved automatically when saving a recipe because the camera devices assigned to a Camera vTool may not be connected at the time of saving the recipe or the settings of the camera device may have been changed by another program in the meantime.
Instead, use the parameters in the Features - All pane under vTool > Configuration Set Persistence to save the settings of a camera device and accompanied settings after you have configured the parameters.
Info
For initial camera device configuration, Basler recommends using the classic pylon Viewer features.
To save camera settings in a recipe:
- Click the Lock Resources button in the Workbench toolbar to establish an exclusive connection to the camera device assigned.

- In the Features - All pane, open the Configuration Set Persistence category and set the Configuration Set Selector parameter to Camera to select the parameter set of the camera device.
- Click Configuration Set Fetch to fetch the settings from the camera device and store it in the Configuration Set Staged parameter.
-
Optional: You can inspect or manually modify the parameter settings by copying the text to a text editor and back into Configuration Set Staged.
In the text editor, you will see that each line of text contains the name and the value of a parameter separated by a tab or = character. Lines starting with # are treated as comments. A configuration set must start with the following line:
# {05D8C294-F295-4dfb-9D01-096BD04049F4}Info
Alternatively, you can use user sets to store camera settings persistently.
-
Click Configuration Set Commit to apply the parameters and store the parameters in the recipe settings. This ensures that parameters are set automatically each time the lock resources operation is executed.
Info
If a camera has already been allocated, the parameter settings are transferred immediately to the camera. If the transfer fails, the parameter settings will not be stored in Configuration Set Active. If no camera is allocated, the settings will be transferred to the camera when it is allocated. If this transfer fails, the recipe can't be started.
Some camera parameters, e.g., those in the Camera Instance configuration set, can only be changed while the camera is closed. In this case, the parameters stored in Configuration Set Active are transferred to the camera when it is allocated before opening the camera.
-
To clear parameter settings from the recipe, click Clear Data.
Using Event Notifications and Chunk Data#
The Camera vTool also allows you to access event and chunk data of the camera. You can add additional output pins for events and chunk data to use these to control your application. Camera events, e.g., exposure end, can be used to control external devices. Chunk data, e.g., timestamp or exposure time, can be used to control and synchronize tasks in an application.
Info
- Pins can only be added when the recipe isn't running.
- Pin names must be unique.
- Allowed data types: Boolean, Float, Integer, and String
Accessing Camera Events#
- Enable the desired event on the camera.
- Select the Camera vTool in the Workbench.
- Open the Features - All pane.
- Go to the vTool > Event Output Control group.
- Execute the Event Pin Add command.
- In the Event Pin Configuration field, enter the configuration of the event pin you want to add. Use the following syntax:
<MyPinName>.Type=<MyPinType>.EventName=<CameraEvent>.ValueName=<CameraEventValue>
where:<MyPinName>: Name of the new output pin<MyPinType>: Data type of the event you want to access (allowed values: Boolean, Float, Integer, and String)<CameraEvent>: Name of the event you want to access as in the camera<CameraEventValue>: Name of the event value as in the camera, e.g.,EventExposureEnd - Press Enter.
The new pin appears in the vTool.
Configuration Example#
Assume you want to create an output pin with the name ExposureEnd and the data type Integer that outputs the information from the exposure end camera event. To do this, enter the following string:
ExposureEnd.Type=Integer.EventName=ExposureEnd.ValueName=EventExposureEnd
Accessing Chunk Data#
- Enable the chunk mode and the desired data chunk on the camera.
- Select the Camera vTool in the Workbench.
- Open the Features - All pane.
- Go to the vTool > Chunk Data Output Control group.
- Execute the Chunk Pin Add command.
- In the Chunk Pin Configuration field, enter the configuration of the data chunk pin you want to add. Use the following syntax:
<MyPinName>.Type=<MyPinType>.ValueName=<ChunkName>
where:<MyPinName>: Name of the new output pin<MyPinType>: Value type of the chunk data you want to access as in the camera<ChunkName>: Name of the chunk you want to access as in the camera, e.g., ChunkExposureTime - Press Enter.
The new pin appears in the vTool.
Configuration Example#
Assume you want to create an output pin with the name ExposureTimeChunk and the data type Integer that outputs the information from the exposure time chunk of the camera. To do this, enter the following string:
ExposureTimeChunk.Type=Float.ValueName=ChunkExposureTime
Troubleshooting#
Multiple Matching Cameras Found
Problem: When opening the Camera vTool dialog, warning signs appear next to camera names:
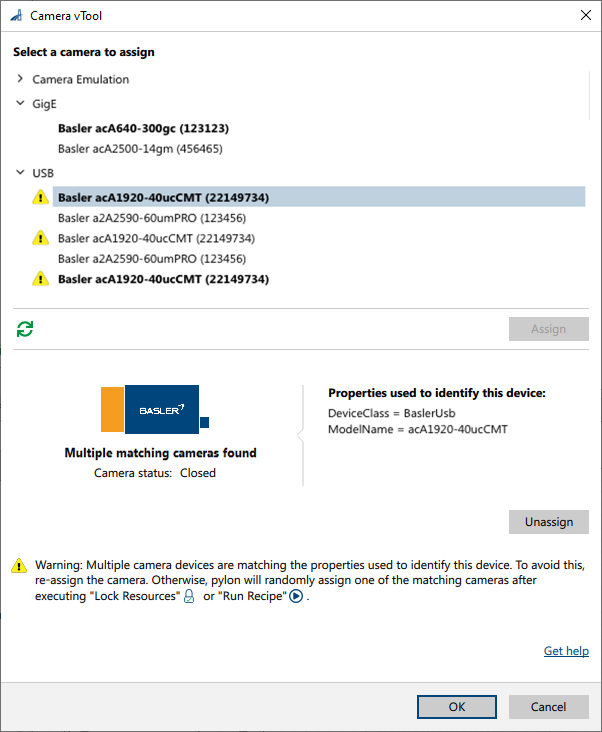
Reason: This is because multiple cameras match the device properties stored in the vTool.
In the example above, the device properties stored are DeviceClass = BaslerUsb and ModelName = acA1920-40uCMT. Three cameras match these properties because all are USB cameras and are named "acA1920-40uCMT".
Solution: To avoid this, either reassign the camera using the dialog or change the properties using the Features pane.
No Matching Camera Found
Problem: When opening the Camera vTool dialog, a "No matching camera found" message is shown.
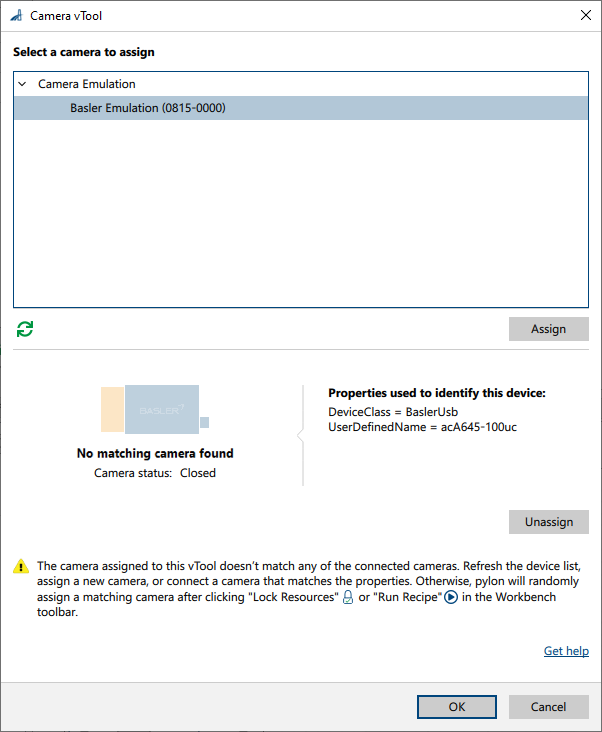
Reason: This is because no cameras match the device properties stored in the vTool.
In the example above, the device properties stored are DeviceClass = BaslerUsb and ModelName = acA645-100uc. However, no camera named "acA645-100uc" is connected.
Solution: To avoid this, either connect the matching camera, reassign the camera using the dialog, or change the properties using the Features pane.
Outputs#
Image#
Returns the image grabbed by a camera. This output image can be used by any vTool accepting images as input.
- Data type: Image
- Image format: As configured on the camera