Aztec Code Reader vTool#
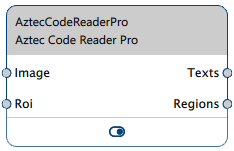
The Aztec Code Reader can detect and decode Aztec codes in images it receives via the Image input pin. It outputs the results via the Regions and Texts output pins.
The region output contains the region in which an Aztec code was found. The text output is the text string encoded by the Aztec code.
If you use the ROI Creator vTool to specify a region of interest before detection, the Aztec Code Reader accepts the ROI data via its Roi input pin. This reduces the area of the image in which the Aztec Code Reader searches for codes which helps to eliminate false candidates. As a side effect, processing will be faster and more robust.
The Aztec Code Reader vTool can be bought as a single license (Basic or Pro) or as part of the Code Reader Bundle license. To buy a license, visit the Basler website.

Aztec Code Reader Versions#
Two versions of the Aztec Code Reader are available. The following table shows the differences between the versions. Click a version in the table heading to jump directly to the relevant section in this topic.
| Basic | Pro | |
|---|---|---|
| How many Aztec codes can you detect? | 3 | Unlimited |
| Can you detect GS1 Aztec codes? | Yes | Yes |
| Can you specify a timeout for detection? | Yes | Yes |
| Which module sizes are allowed? | Side lengths between 6–20 pixels | Side lengths between 1–100 pixels |
| Are gaps between modules allowed? | Yes, small gaps | Yes, large gaps |
| Can you increase the tolerance for the finder pattern? | No | Yes |
| Can you detect light-on-dark Aztec codes? | No This requires a preprocessing step. | Yes |
| Can you detect mirrored Aztec codes? | Yes | Yes |
| Is the Enhanced detection mode available? | No | Yes |
| Is the Maximum detection mode available? | No | Yes |
| Valid data types for Roi input pin | RectangleF, RectangleF Array, Region, Region Array | RectangleF, RectangleF Array, Region, Region Array |
| Buy license | Visit Basler website | Visit Basler website |
How It Works#
Depending on the version of the Aztec Code Reader, you can detect up to three or an unlimited number of Aztec codes in an image.
You can specify a timeout to end detection after a certain amount of time. If you know that your images only contain one Aztec code, configuring the Aztec Code Reader to only look for one code may save processing time.
Common Use Cases#
- Reading Aztec codes: In this case, you only need to connect the Texts output pin to output the decoded strings.
- Determining the positions of Aztec codes: Use the positions and sizes of the Aztec codes returned by the Regions output pin for subsequent processing.
Aztec Code Reader Basic#
You can detect up to three Aztec codes in an image. Limiting the number to the expected number of codes in an image may save processing time.
Detection Criteria#
For Aztec codes to be detected and decoded, they must meet the following criteria:
- Code structure: The Aztec Code Reader Basic supports the standard Aztec code structure (matrices with 11 to 151 rows and columns).
- Module size: The sides of individual modules must be between 6 and 20 pixels long.
- Gaps between modules: Small gaps between modules are allowed.
- Finder pattern tolerance: All rings of the finder pattern must be clearly visible in the image.
- Polarity: Aztec codes must be dark-on-light patterns. For light-on-dark patterns, run a preprocessing step to invert the input image, e.g., by using the Gray Value Transformer vTool.
- Mirroring: Aztec codes mirrored vertically, horizontally, or both can be detected.
- Legibility: Codes must be free from visual flaws, e.g., no reflections or smudging, and must have sufficient resolution.
Data Code Types#
The Data Code Type drop-down list allows you to select the data code type you want to look for:
- Aztec Codes
- GS1 Aztec Codes
The symbol structure of Aztec codes and GS1 Aztec codes is identical but their coding schemes are different.
When decoding standard Aztec codes, the Aztec Code Reader Basic outputs the raw strings. If you select GS1 Aztec codes, the Aztec Code Reader Basic decodes the strings in a format that is compliant with the GS1 standard.
Timeout#
For time-critical applications you can specify a timeout. A timeout helps in cases where the processing time varies or can't be foreseen, for example, if the image doesn't contain a Aztec code. Once the specified timeout is exceeded, the detection process stops and moves on to the next image.
Basler recommends setting the timeout a bit lower than the desired time limit. This is because the vTool doesn't stop the detection process immediately. Therefore, set the timeout to 70–80 % of the desired time limit.
Configuring the vTool#
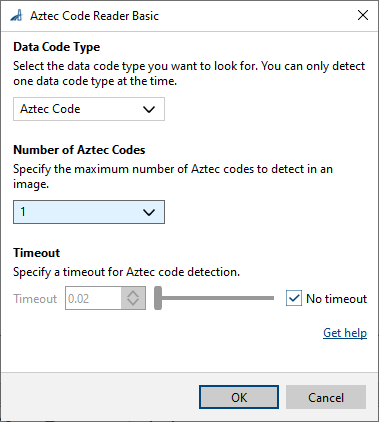
To configure the Aztec Code Reader Basic vTool:

- In the Recipe Management pane in the vTool Settings area, click Open Settings or double-click the vTool.
The Aztec Code Reader Basic dialog opens. - In the Data Code Type drop-down list, select the desired data code type.
- In the Number of Aztec Codes area, select how many Aztec codes you want to detect.
- In the Timeout area, specify whether you want detection to end after a certain amount of time. If you want to specify a timeout, clear the No timeout check box and enter the desired timeout in the input field.
You can view the result of the Aztec Code Reader Basic in a pin data view. Here, you can select which outputs to display.
Aztec Code Reader Pro#
You can detect an unlimited number of Aztec codes in an image. Limiting the number to the expected number of codes in an image may save processing time.
Detection Criteria#
For Aztec codes to be detected and decoded, they must meet the following criteria:
- Code structure: The Aztec Code Reader Pro supports the standard Aztec code structure (matrices with 11 to 151 rows and columns).
- Module size: In Enhanced detection mode, the sides of individual modules must be between 2 and 100 pixels long. In Maximum detection mode, the sides of individual modules must be between 1 and 100 pixels long.
- Gaps between modules: Large gaps between modules are allowed.
- Finder pattern tolerance: The rings of the finder pattern must at least be partially visible in the image.
- Polarity: Aztec codes can be dark-on-light or light-on-dark patterns or a mixture of both.
- Mirroring: Aztec codes mirrored vertically, horizontally, or both can be detected.
- Legibility: Codes with visual flaws, e.g., reflections or smudging, and with low resolution can be detected.
Data Code Types#
The Data Code Type drop-down list allows you to select the data code type you want to look for:
- Aztec Codes
- GS1 Aztec Codes
The symbol structure of Aztec codes and GS1 Aztec codes is identical but their coding schemes are different.
When decoding standard Aztec codes, the Aztec Code Reader Pro outputs the raw strings. If you select GS1 Aztec codes, the Aztec Code Reader Pro decodes the strings in a format that is compliant with the GS1 standard.
Detection Modes#
Standard: This is a fast detection mode but deformed or low-resolution data codes won't be detected.
Enhanced: In this detection mode, the Aztec Code Reader Pro is more tolerant regarding the quality of the Aztec codes. This means that codes that don't meet all the detection criteria can be detected. Enabling this option slows down the detection process.
Maximum: In this detection mode, in addition to the advantages of the Enhanced detection mode, the Aztec Code Reader Pro accepts smaller module sizes and is more robust in the detection of smaller modules. This means that more codes that don't meet all the detection criteria can be detected. Enabling this option slows down the detection process.
Timeout#
For time-critical applications you can specify a timeout. A timeout helps in cases where the processing time varies or can't be foreseen, for example, if the image doesn't contain a Aztec code. Once the specified timeout is exceeded, the detection process stops and moves on to the next image.
Basler recommends setting the timeout a bit lower than the desired time limit. This is because the vTool doesn't stop the detection process immediately. Therefore, set the timeout to 70–80 % of the desired time limit.
Configuring the vTool#
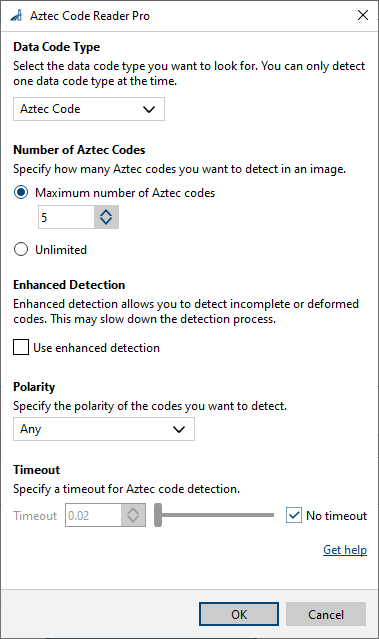
To configure the Aztec Code Reader Pro vTool:

- In the Recipe Management pane in the vTool Settings area, click Open Settings or double-click the vTool.
The Aztec Code Reader Pro dialog opens. - In the Data Code Type drop-down list, select the desired data code type.
- In the Number of Aztec Codes area, select how many Aztec codes you want to detect. Select Unlimited if the maximum number of codes to be detected is not known.
- In the Detection Mode area, select the desired detection mode.
- In the Polarity drop-down list, select the option appropriate for your application.
If codes in your application have a specific polarity, select the setting accordingly. If the polarity of the codes in the images is not known or multiple codes with different polarities occur, select Any. - In the Timeout area, specify whether you want detection to end after a certain amount of time. If you want to specify a timeout, clear the No timeout check box and enter the desired timeout in the input field.
You can view the result of the Aztec Code Reader Pro in a pin data view. Here, you can select which outputs to display.
Inputs#
Image#
Accepts images directly from a Camera vTool or from a vTool that outputs images, e.g., the Image Format Converter vTool.
- Data type: Image
- Image format: 8-bit mono or color images. Color images are converted internally to mono images.
Roi#
Accepts a region of interest from the ROI Creator vTool or any other vTool that outputs regions or rectangles. Multiple rectangles or regions are merged internally to form a single region of interest.
- Data type: RectangleF, RectangleF Array, Region, Region Array
Outputs#
Texts#
Returns the text string encoded in a Aztec code.
- Data type: String Array
Regions#
Returns a region for each Aztec code found. The region is of rectangular shape. It can be used for visualization purposes or for subsequent feature extraction.
- Data type: Region Array
OrientedBoxes_px#
Returns an oriented bounding box for each Aztec code found.
- Data type: RectangleF Array
Related vTools#
Typical Predecessors#
Typical Successors#
- Region Feature Extraction vTool
Allows you to determine the center, size, and orientation of the Aztec codes found.