Basler Vision Connector: Getting Started#
Installing the Basler Vision Connector on the Local IE Management System#
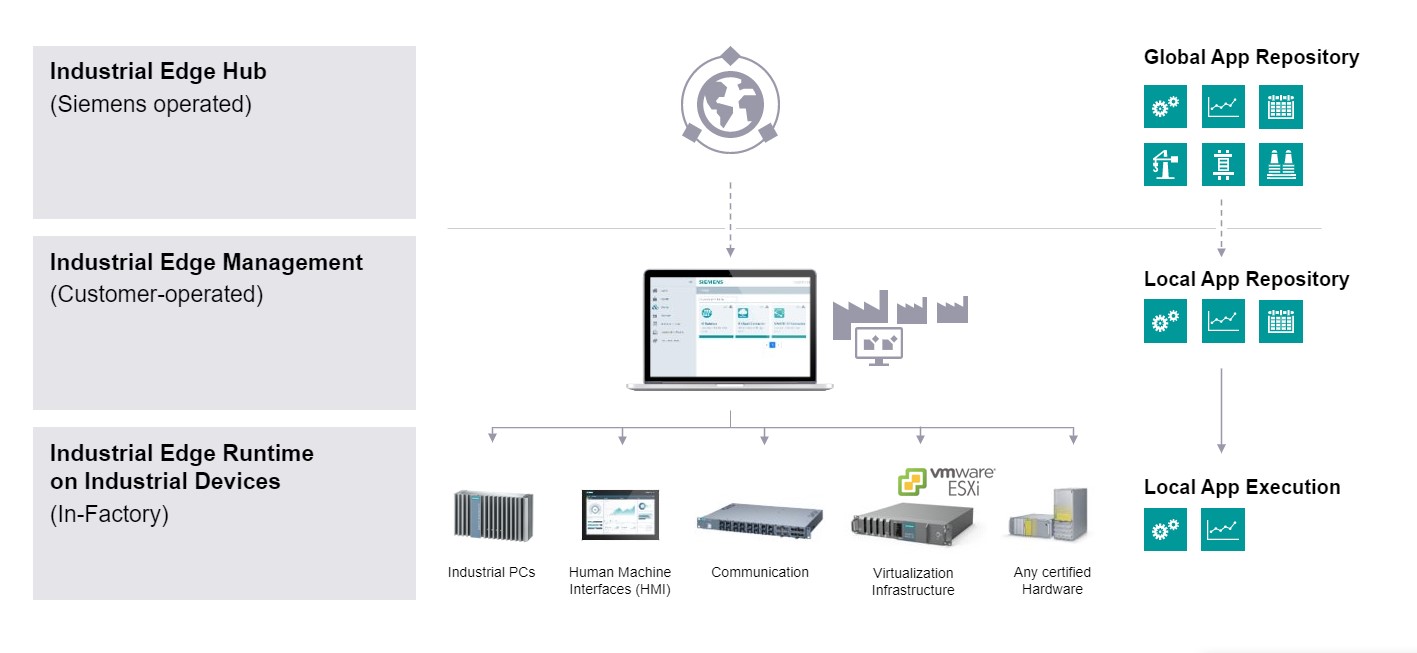
To install the Basler Vision Connector on the local IE Management system, you need to perform steps in all three components as described in this topic.
Installation Steps in the Industrial Edge Hub#
On the Industrial Edge Hub, you purchase apps:
- Open the Siemens Hub Page and the Siemens Marketplace website.
-
Purchase the Basler Vision Connector app type you require: Multi Camera Connection or Single Camera Connector. The Single Camera Connector is free of charge, but you have to request login data in the Industrial Edge Hub. The Multi Camera Connector is not free of charge. See information under Prerequisites.
-
You get the access code for the purchased Basler Vision Connector app from your Siemens contact person.
-
Log into the Siemens Industrial Management Hub with your access data provided by Siemens.
-
In the Industrial Edge Management Hub: In the Library menu, click the Basler Vision Connector application version you want to install. A window with all available/purchased apps appears.

Depending on your use case, select the corresponding Basler Vision Connector app:
- If you want to use only one camera: Select the Basler Vision Connector Single Camera Connection app.
- If you want to use more than one camera: Select the Basler Vision Connector Multi Camera Connection app.
It's possible to use the Multi Camera Connection version of the Basler Vision Connector with a single camera. But if you use the Single Camera Connection version with more than one camera, an error message is displayed indicating that this isn't possible.
In the following topics, the generic term Basler Vision Connector is used whenever it doesn't matter how many cameras are used. If it's important to differentiate, the specific Basler Vision Connector name is indicated, i.e. Basler Vision Connector (Multi Camera Connection) or Basler Vision Connector (Single Camera Connection).
-
Select the Basler Vision Connector app version you want to install by clicking the app name. The Installation and subscription overview list appears.
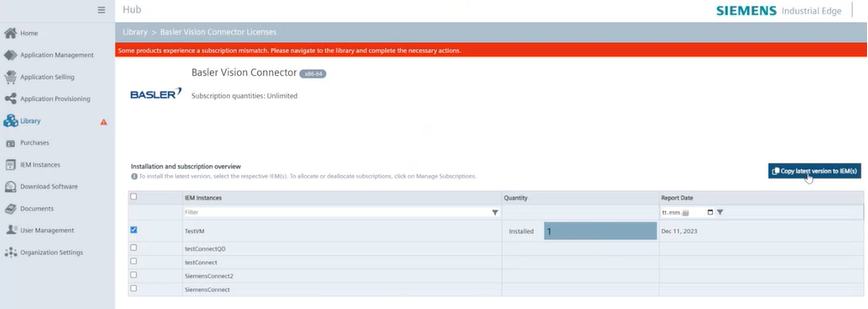
The Installation and subscription overview list displays the installed IE Management instances.
-
Select the local repository or repositories (IEM) where you want to deploy the Basler Vision Connector app to: Activate the corresponding checkbox or checkboxes.
-
Click Copy latest version to IEM(s).
The Basler Vision Connector app is now copied to your local Industrial Edge Device management system.
Enabling the Layer 2 Network on Your Edge Device#
Before you install the Basler Vision Connector on your Edge Device, you must enable the layer 2 network on your Edge Device. Otherwise an error occurs during the installation of the Basler Vision Connector app on your local Edge Device.
To enable the layer 2 network on your Edge Device:
-
On your Edge Device: Go to the Settings menu item and select Connectivity tab > LAN Network.

-
Click the pencil symbol to edit the network settings.

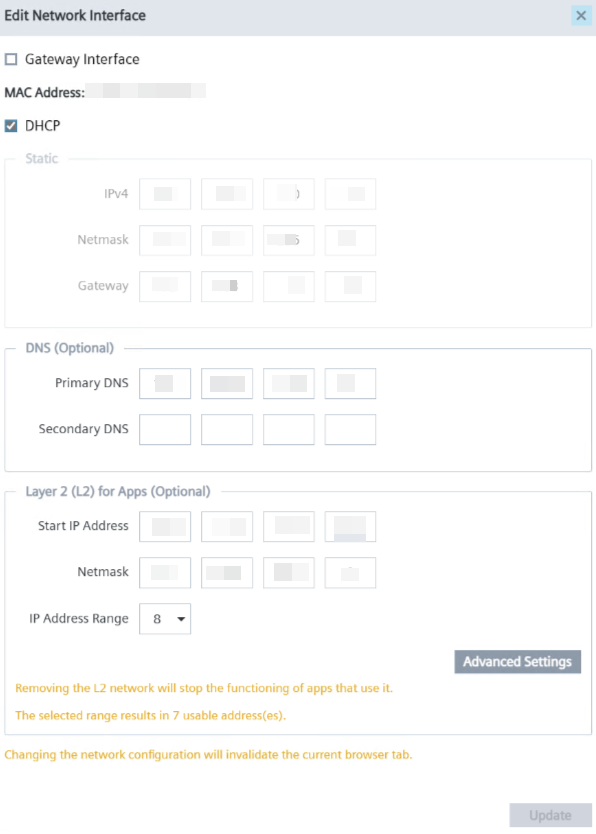
The Edit Network Interface dialog appears:
-
In the Layer 2 (L2) for Apps (Optional) group: Enter the number for the start address in the Start IP Address field.
- Click Update. The Layer 2 network is now enabled.
-
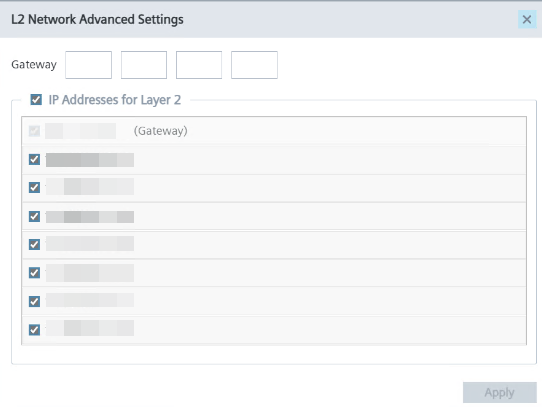
For a later step, check the available IP addresses: Click Advanced Settings to see the available IP addresses.
These numbers are important when configuring the IP address of the camera.
IP address numbers with activated checkboxes are available:
Installation Steps in the Industrial Edge Management Platform#
Info
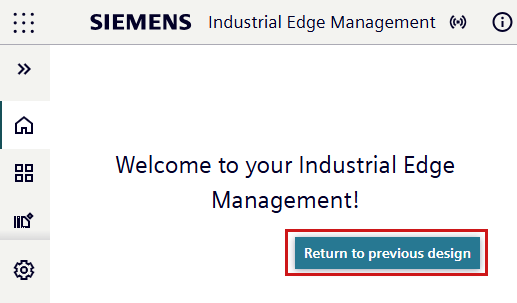
The following installation instructions describe the installation process in the old design. You can switch to the old design via the button Return to previous design:
To install the Basler Vision Connector app to a local IE device in your factory:
-
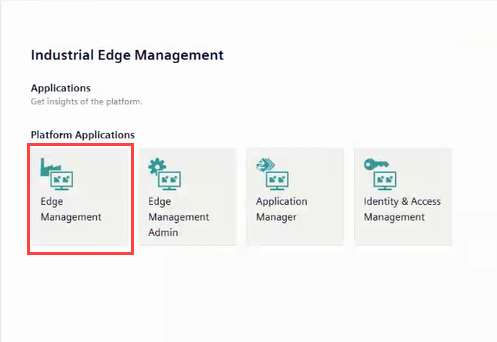
Open the start page of your Industrial Edge Management platform and select Edge Manager.
-
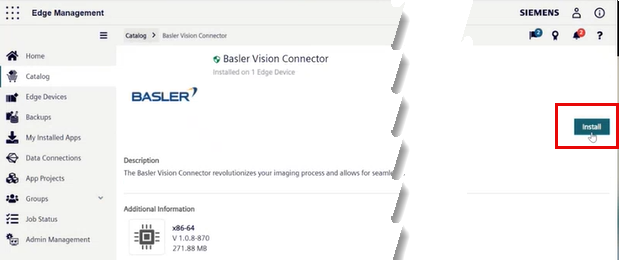
Select the Catalog menu, and select the Basler Vision Connector app you want to install. The Catalog window displays the deployed Basler Vision Connector app.
-
Click Install.
The Install App wizard appears. -
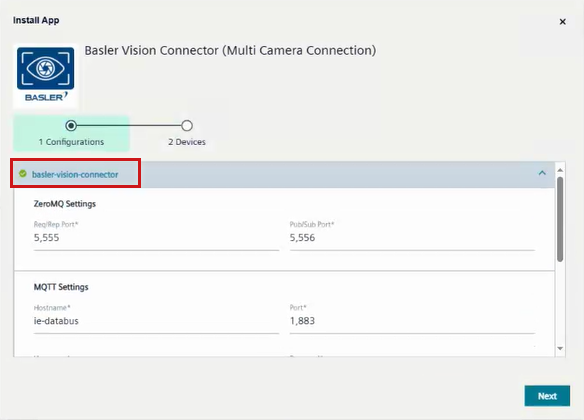
On the Install App > Configurations wizard page, configure the values required for your Basler Vision Connector.
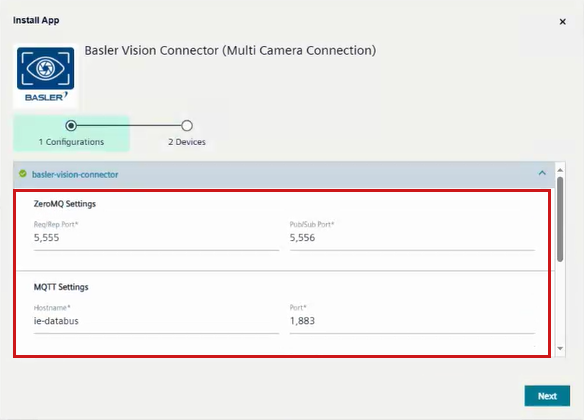
This table shows the default values:
Default Values ZeroMQ Settings ZeroMQ Req/Rep control channel enabled: true Req/Rep port: 5555 Pub/Sub port: 5556 MQTT Settings MQTT control channel enabled: true Host name: ie-databus Port: 1883 User name: <your_username> Password: <your_password> Root topic: Enter a unique ID. If you don't fill out this field, the string BaslerVisionConnectoris used.Logging Level: Info Available values: Info / Warning / Error / Debug MTU MTU optimization Auto MTU size <Deactivated for MTU optimization = Auto> -
Select the checkbox basler-vision-connector. If the basler-vision-connector checkbox isn't selected, your configured settings aren't saved to the installation of the Basler Vision Connector.
-
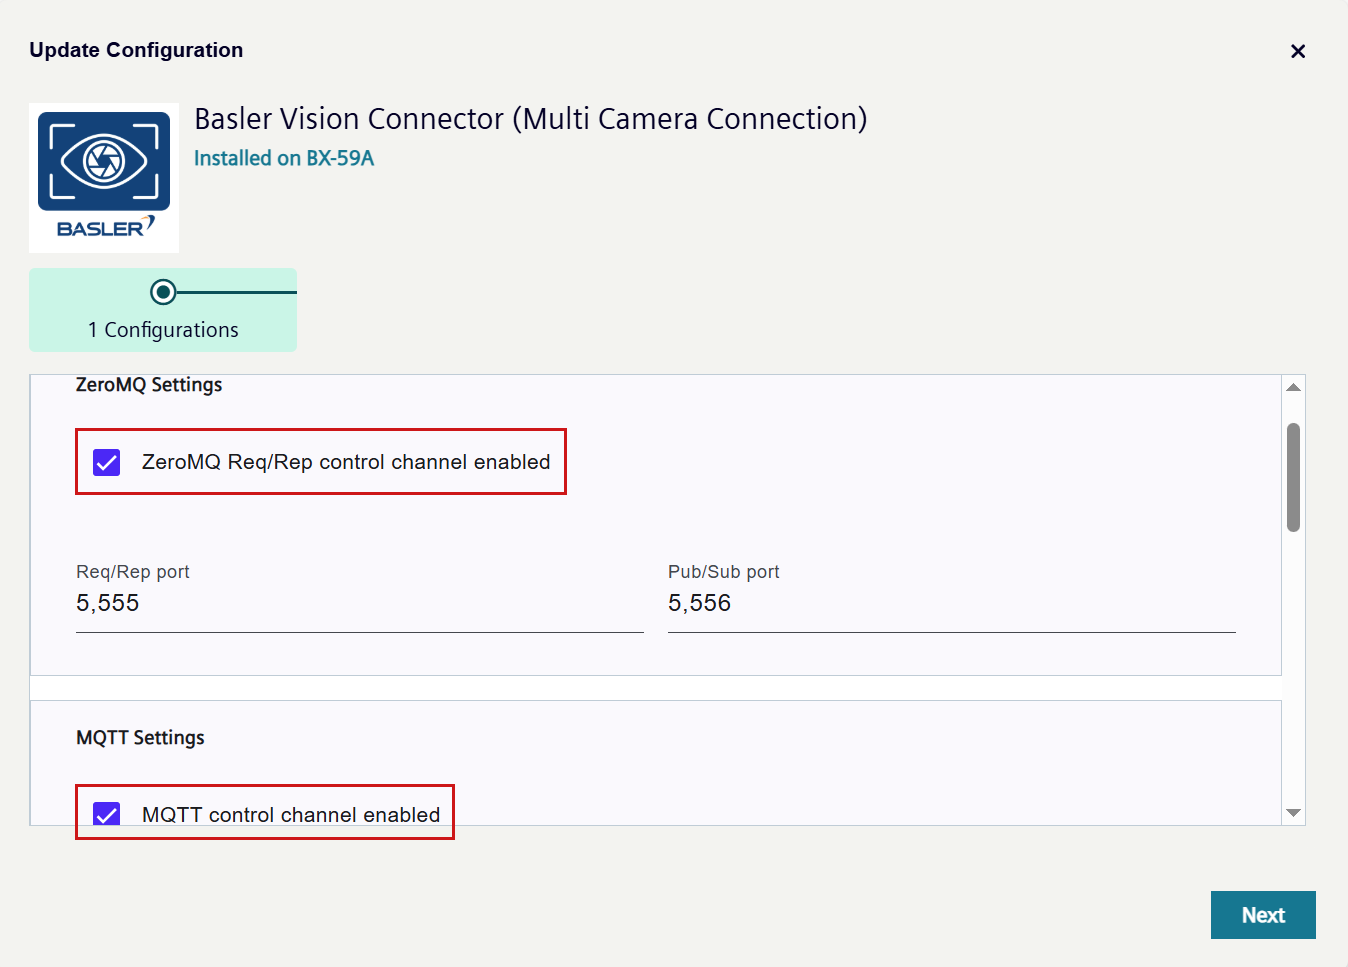
Select at least one of the check boxes ZeroMQ Req/Rep control channel enabled / MQTT control channel enabled. If you select MQTT control channel enabled, you must enter a user name and a password for your MQTT broker.
-
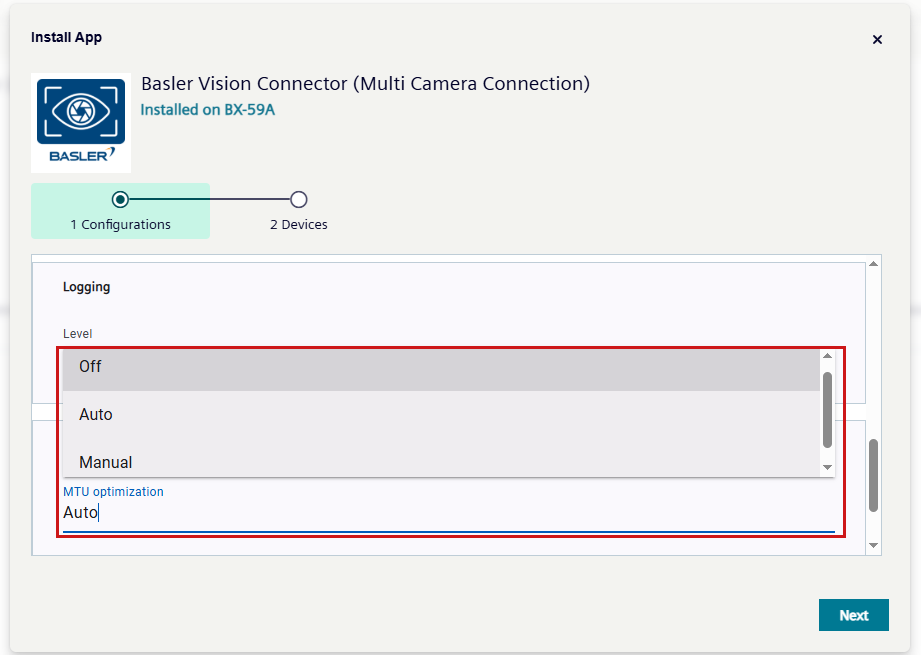
In the field MTU optimization, select one of the three options:
- AUTO: Is selected by default. Calculates the maximum packet size your network card and camera can send/receive and sets this maximum value.
- Off: No value is set for maximum transfer units (MTU), i.e. the default value of 1,500 bytes is used.
- Manual: You can manually enter the desired value for maximum transfer units (MTU).
Note
Before changing MTU values, manually close the camera connection. Otherwise you might have data loss, because the camera connection is closed automatically when changing MTU values.
-
Click Next.
-
If the layer 2 network hasn't been configured before (see Enabling the Layer 2 Network), an error message is displayed:
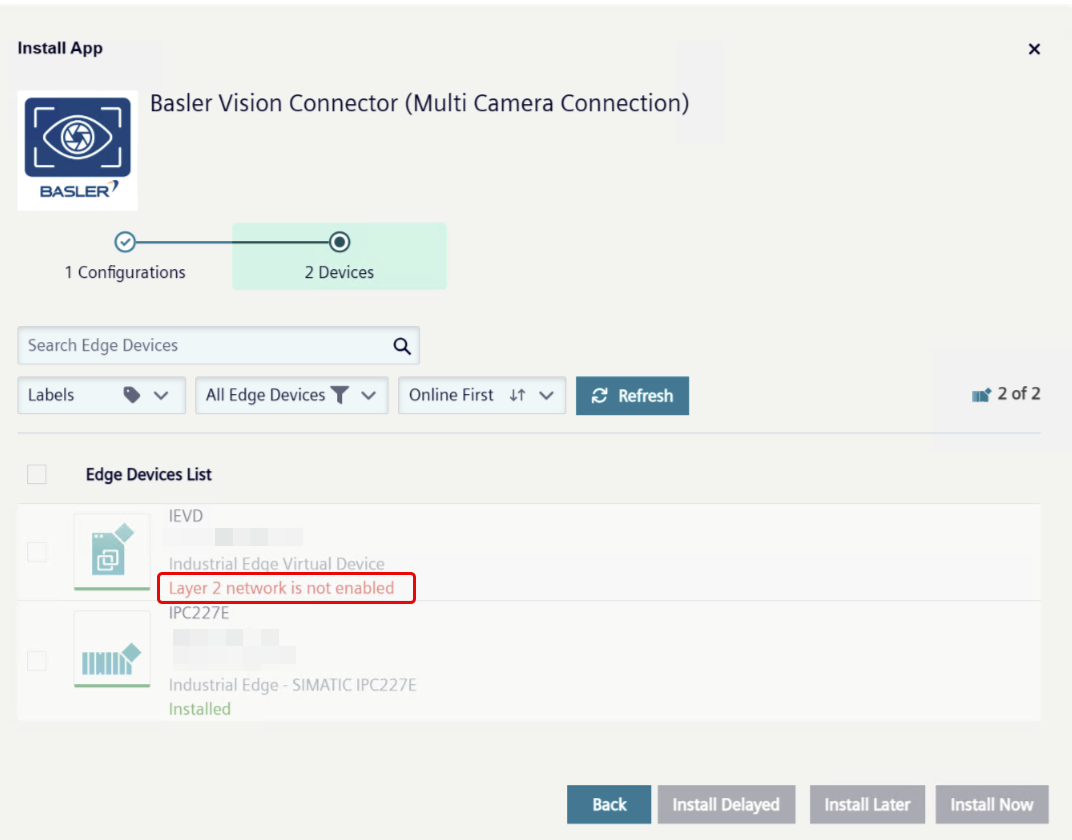
If this message appears, enable the layer 2 network as described in Enabling the Layer 2 Network.
-
Click Next.
The Device Selection page appears.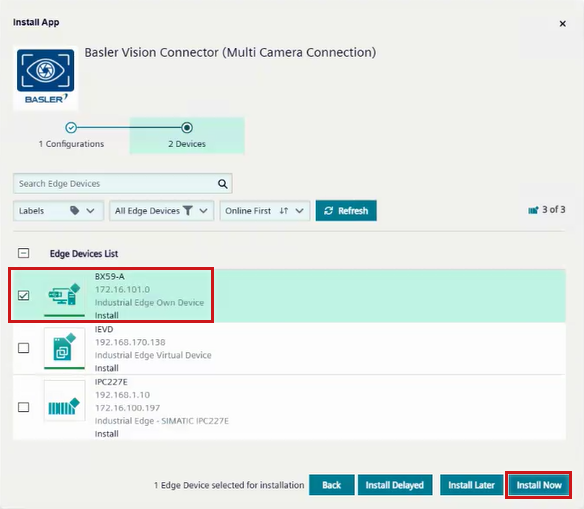
-
In the Edge Devices List section, activate the checkbox of the local IE device or devices on which you want to install the Basler Vision Connector app and click Install Now.
-
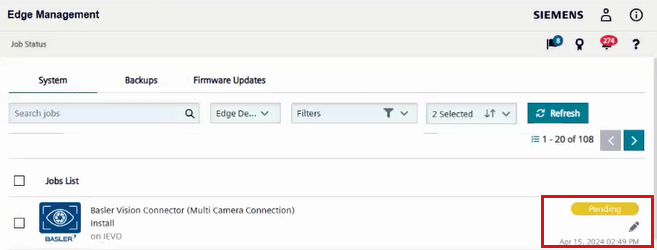
You can see the progress of your installation in the Edge Management platform under Job Status:
-
Once the Basler Vision Connector app has been installed, you can download a log file that documents the installation status in the Apps menu:
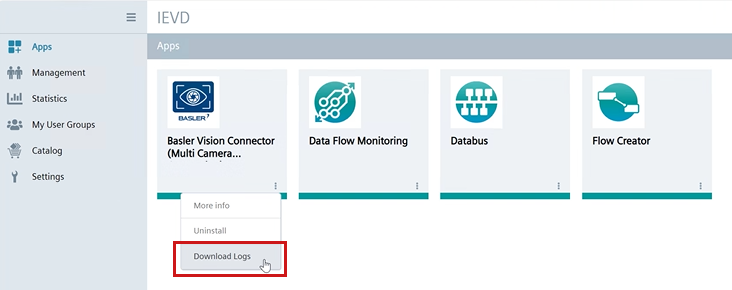
Use this log file later on when a problem occurs in the Basler Vision Connector. If problems occur, set the log level to Debug in the configuration of the Basler Vision Connector.
Changing the Configuration of the Basler Vision Connector (Edge Management Platform)#
You can change the settings you have configured during installation of the Basler Vision Connector. To change these settings:
-
Go to your Edge Management platform, click the three dots of the Basler Vision Connector in My Installed Apps and select Update Configuration from the drop-down menu.
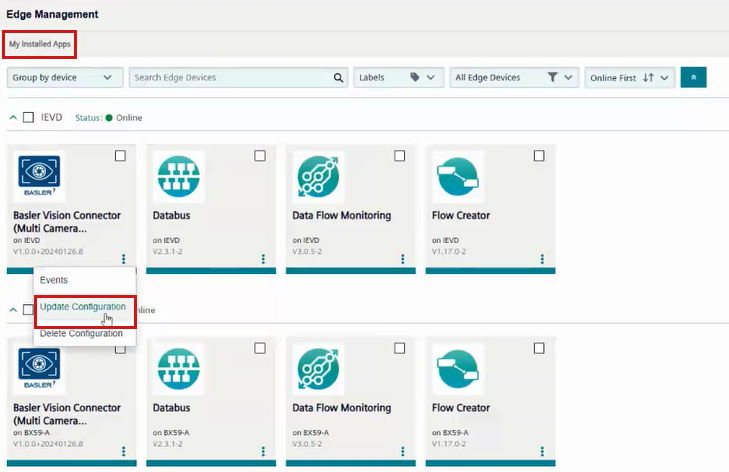
The Update Configuration wizard opens up.
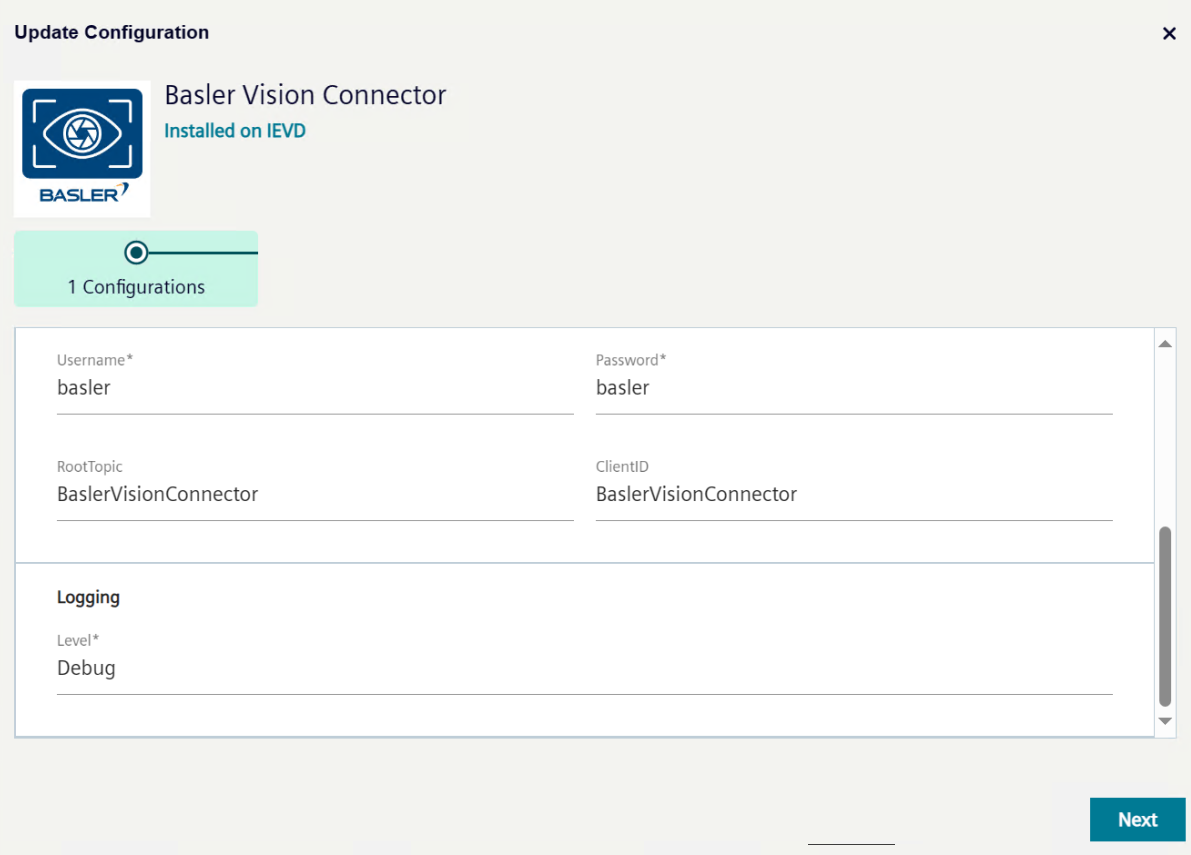
-
Configure the settings as required, go through the Update Configuration wizard and click Next and Update Now.
-
If your settings are valid, they are implemented immediately, a restart of the system isn't necessary. If the settings aren't valid, the old settings are restored. You can check in the log file whether your new settings have been stored or not.
Connecting Cameras#
To connect your GigE camera, Basler recommends using the device BX-59A, or BX-39A. However, the following restrictions apply when using these devices:
- BX-59A and BX-39A both have four GigE ports to connect a camera to. However, only the left two ports X1 P1 ("eno1" in the IED software) and X2 P1 ("eno2" in the IED software) work properly with Basler GigE cameras. Therefore, Basler recommends using only the left two ports of these Industrial Edge Devices.
- If you experience problems regarding a stable connection or transfer rate with a Basler camera, update the firmware of your camera. To receive an update of the camera firmware, contact the Basler Support Team.
Connecting Several Cameras Simultaneously to an Industrial Edge Device#
If you want to connect more than one camera with the BX-59A or BX-39A IED, connect the cameras with a network switch that is connected to one of the two left ports X1 P1 ("eno1" in the IED software) and X2 P1 ("eno2" in the IED software).
The following switches are recommended:
- Netgear GS110TP, or
- Netgear MS510TXPP for a broader bandwidth.
Connecting 10GigE Cameras#
To connect one or more 10GigE Cameras:
- Plug the interface card into the BX-59A device.
- Connect the switch to the Broadcom NetXtreme 2x 10GbE, LAN-Adapter interface card.
- Connect the cameras to the Netgear MS510TXPP switch.
Configuring the Camera's IP Address#
To configure the IP address of your camera:
- Make sure the camera you want to configure is powered and online.
-
On a PC that isn't the Edge Device (Windows or Linux), configure the camera's IP address so that it is in the range defined in the layer 2 network.
Only then the camera is visible to the Edge Device and hence to the Basler Vision Connector app.
You can use the pylon IP Configurator to check and if necessary to adapt the camera's IP address (see screenshot below). For information, see Assigning an IP Address to a Camera.Info
The pylon IP Configurator isn't included in the delivery of the Basler Vision Connector, but is part of the Basler pylon Software Suite.

Info
The following camera parameter names are always taken directly from the camera firmware:
SetParametersGetParameters
The
SetQuickParameterschanges all gain parameter names from the camera firmware toGain.
Connecting Your App to the Basler Vision Connector#
You can connect any of your Siemens Industrial Edge app with the Basler Vision Connector. To connect your app to the Basler Vision Connector via ZMQ, use the following host name:
| Linux | |
|---|---|
| Multi Camera | baslervisionconnector-multi-x86-64 |
| Single Camera | baslervisionconnector-single-x86-64 |
Alternatively, you can connect your app via the IP address of the Basler Vision Connector. To find out the IP address of the Basler Vision Connector, you can use the Data Flow Monitoring app.
To connect your app via MQTT, use the IP address or the host name of the Databus app.
Using the JSON Test Files with Industrial Edge Flow Creator#
To use the files:
- For the next steps (opening the camera, setting parameters, etc.), download the following JSON test files to your computer. These files are only available via the Basler Product Documentation:
-
Make sure that the following apps are installed on your Edge Device in addition to the Basler Vision Connector:
For the MQTT test you need:
- the Flow Creator app
- the Data Flow Monitoring app (to find out the IP address of the Basler Vision Connector)
- the Databus app (= MQTT Broker)
For the ZMQ test you need:
- the Flow Creator app
- the Data Flow Monitoring app (to find out the IP address of the Basler Vision Connector)
Instructions for MQTT#
A connection to the MQTT broker must be established and the root topics must be subscribed. To ensure that:
- Go to Data Connections in your Industrial Edge Management platform.
-
Select the device where the Databus and the Basler Vision Connector app are installed and add a new user by clicking the
 button.
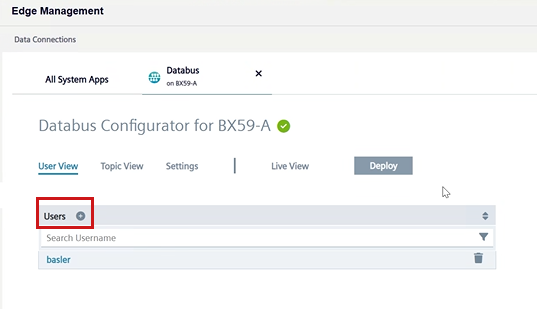
-
Enter your username and password and select the permission Public and Subscribe.
- Subscribe to the root topic: Click the Add Topics button
 .
. -
In the Add Topic dialog, add the topic BaslerVisionConnector/#, select the permission Publish and Subscribe and click Save.
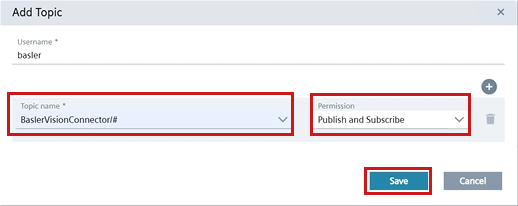
-
Click Deploy.

The Deploy dialog opens up:
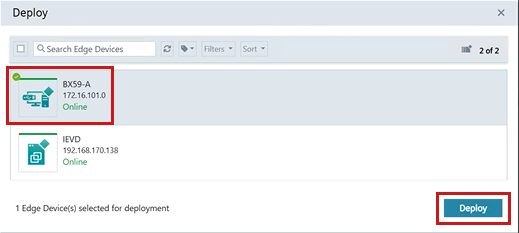
-
Select the Device on which the BVC is installed and click Deploy. The deployment process takes some seconds.
-
In the Edge Management platform, open your Edge Device.

-
Go to Apps and click Flow Creator. The Flow Creator app opens up.
-
From the menu, select Import. Import the MQTT JSON test file.
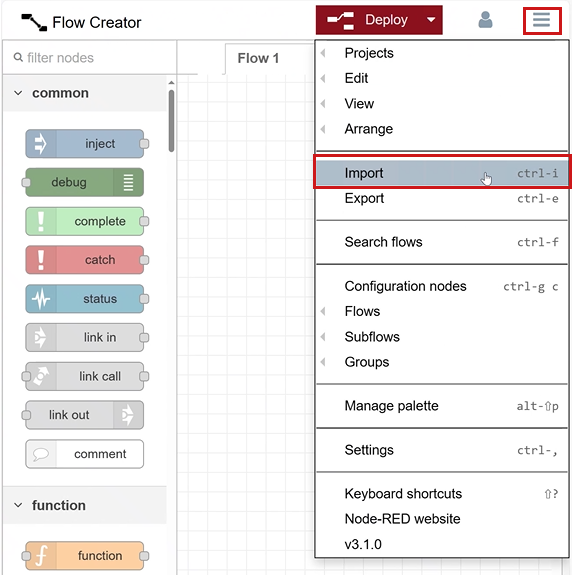
The Test JSON file is imported and displayed as topics in the Flow Creator app. -
Double-click the topic BaslerVisionConnector/request. The Edit mqtt out node dialog opens up. Click the pencil/edit button.
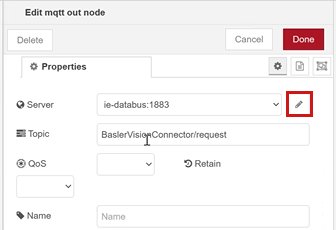
-
Go to Security tab.
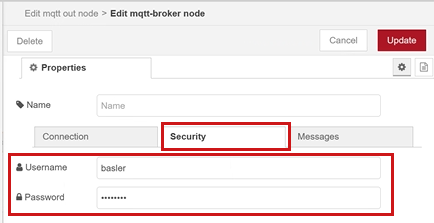
-
Ensure that your user name and password are correct. Click Update and Done.
- Double-click the topic BaslerVisionConnector/response. The Edit mqtt out node dialog opens up. Click the pencil/edit button.
- Go to Security tab.
- Ensure that your user name and password are correct. Click Update and Done.
-
Click Deploy. The connection to the MQTT broker is established. If the connection is established correctly, the topics BaslerVisionConnector/request and BaslerVisionConnector/response are shown as connected:
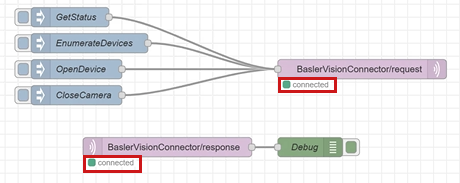
-
Now you can send messages by clicking the available topics.
- Adapt the serial number of your camera in the relevant topics/messages.
-
You can add new messages by adding a new inject node. See Messaging for information about available messages.

Instructions for ZMQ#
Note
The following instructions are valid for working with a virtual IE device. If you have a physical IED, you must build a NodeRed application with the node-red-contrib-zeromq node. See the Siemens Documentation: Develop an Application for instructions.
-
In the Edge Management platform, open your Edge Device.

-
Go to Apps and click Flow Creator. The Flow Creator app opens up.
-
From the menu, select Manage palette.
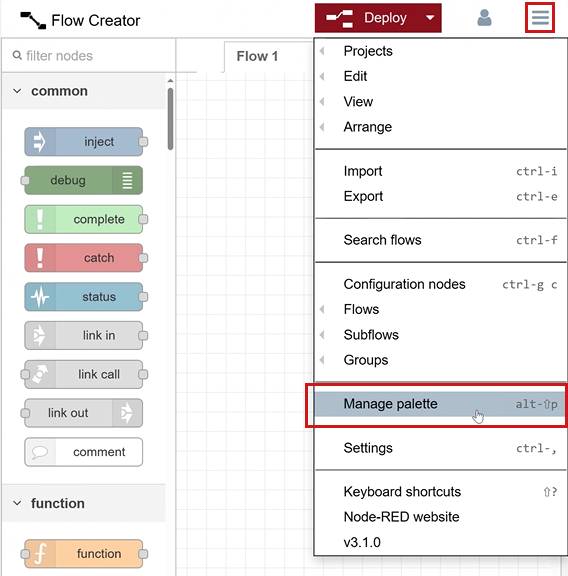
-
The User Settings menu opens up. On the Install tab, type zmq into the search filed and click Install for the node-red-contrib-zeromq node.
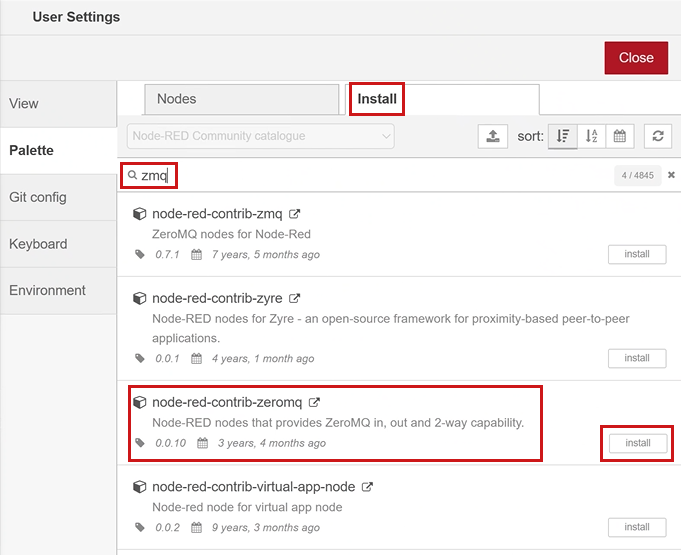
The node-red-contrib-zeromq node is installed.
-
From the menu, select Import. Import the ZMQ JSON test file.

-
In the imported test file, connect the ZMQ topics, i.e. zeromq and {DeviceID}/stream, to the Basler Vision Connector app: Click the node and change the host name to
baslervisionconnector-multi-x86-64orbaslervisionconnector-single-x86-64.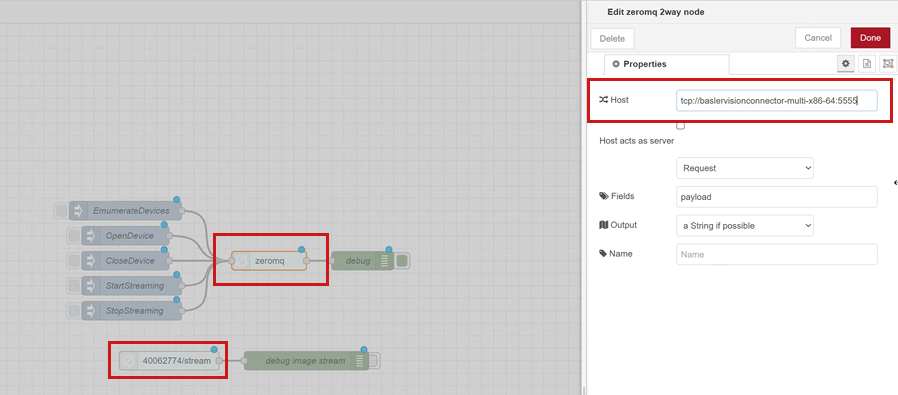
If the connection is established correctly, the topics zeromq and {DeviceID}/stream are shown as connected:
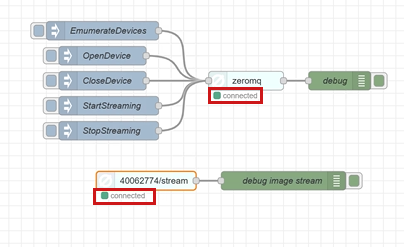
-
Now you can send messages by clicking the available topics. To see the reply of the message, switch to the debug mode:
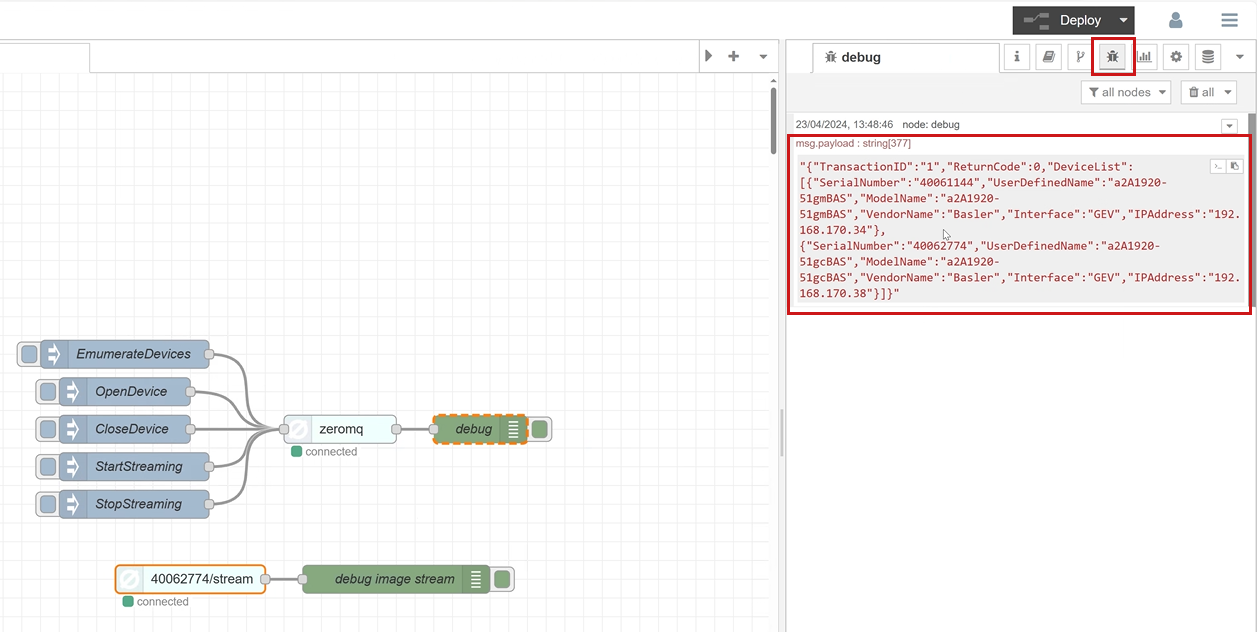
-
You can add new messages by adding a new inject topic. See Messaging for information about available messages.
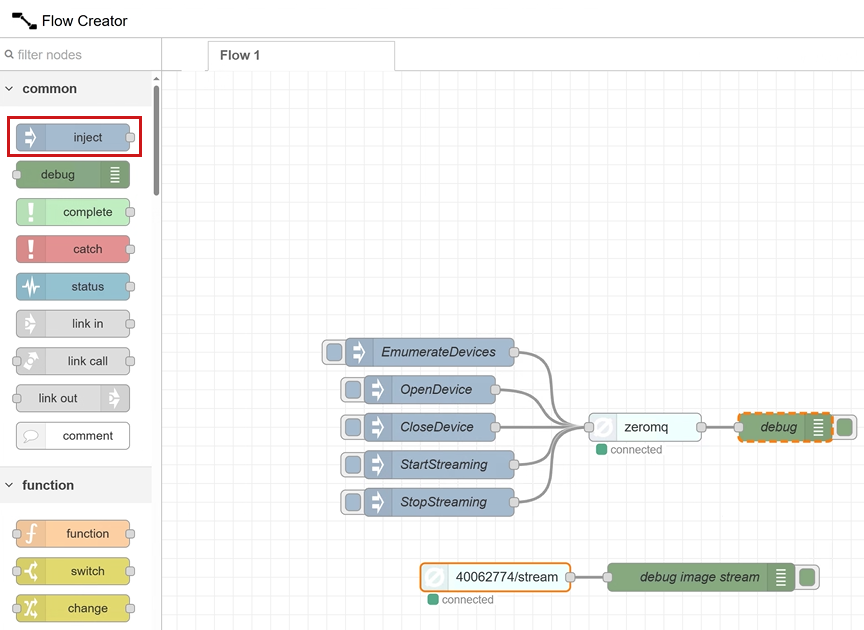
Instructions for ZMQ with Image Viewer#
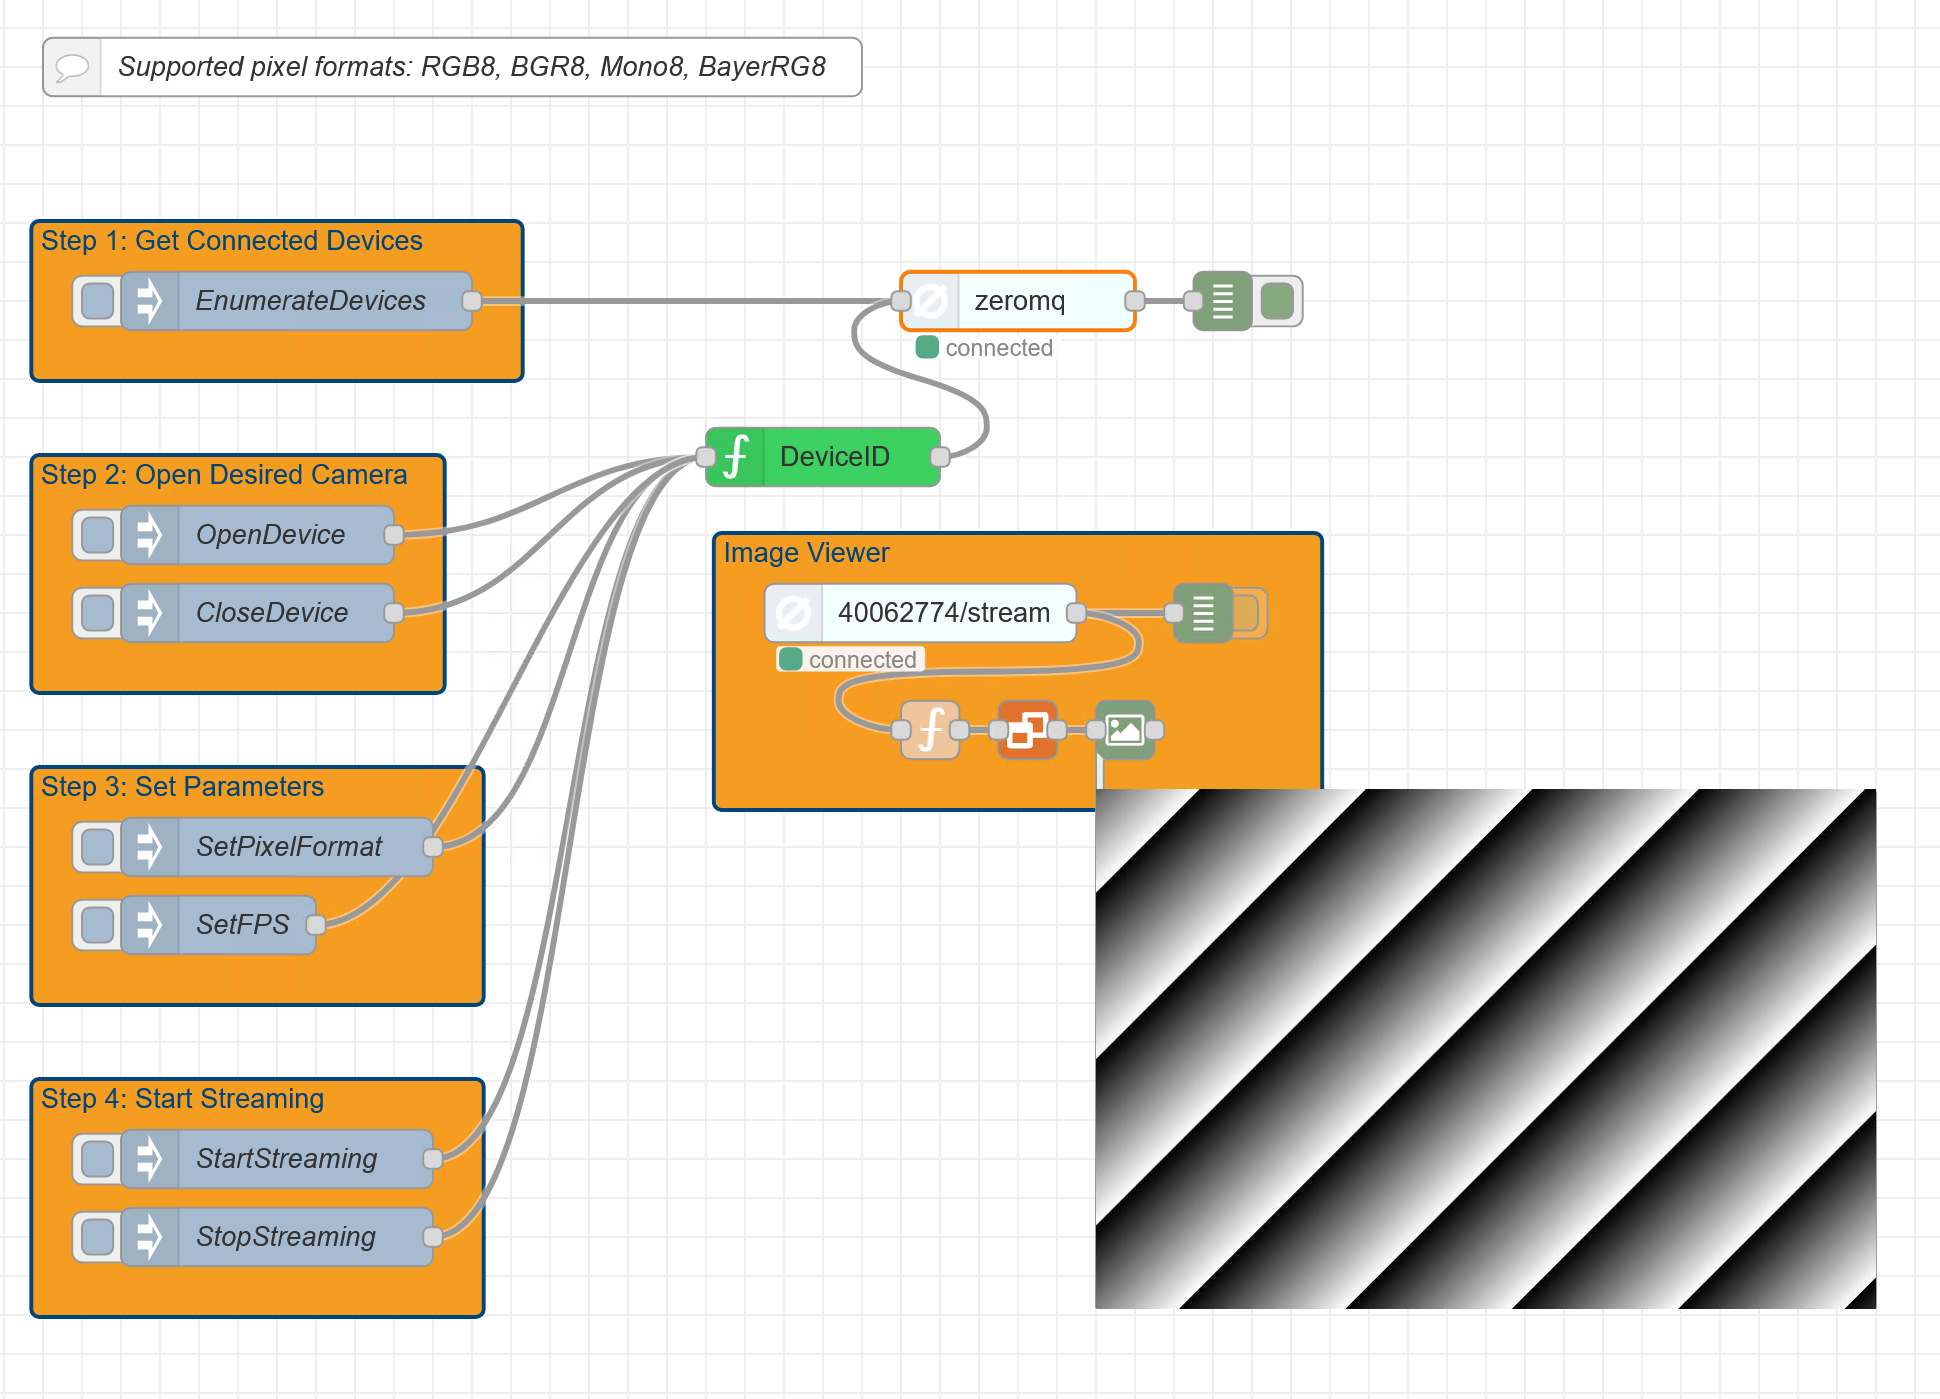
With the Image Viewer in the ZMQ JSON Test File with File Image Viewer you can preview the images of your camera.
Supported Pixel Formats
The Image Viewer only supports the following 8-bit pixel formats: RGB8, BGR8, Mono8, BayerRG8.
Note
The following instructions are valid for working with a virtual IE device. If you have a physical IED, you must build a NodeRed application with the following nodes:
- node-red-contrib-zeromq
- node-red-contrib-image-tools
- node-red-contrib-libjpeg-turbo
- node-red-contrib-mp-function
See the Siemens Documentation: Develop an Application for instructions.
To use the Image Viewer:
-
In the Edge Management platform, open your Edge Device.

-
Go to Apps and click Flow Creator. The Flow Creator app opens up.
-
From the menu, select Manage palette.

-
The User Settings menu opens up. On the Install tab, select the following nodes for installation:
-
From the menu, select Import. Import the ZMQ JSON test file with Image Viewer.

-
In the imported test file, connect the ZMQ topics, i.e. zeromq and {DeviceID}/stream, to the Basler Vision Connector app: Click the node and change the host name to
baslervisionconnector-multi-x86-64orbaslervisionconnector-single-x86-64.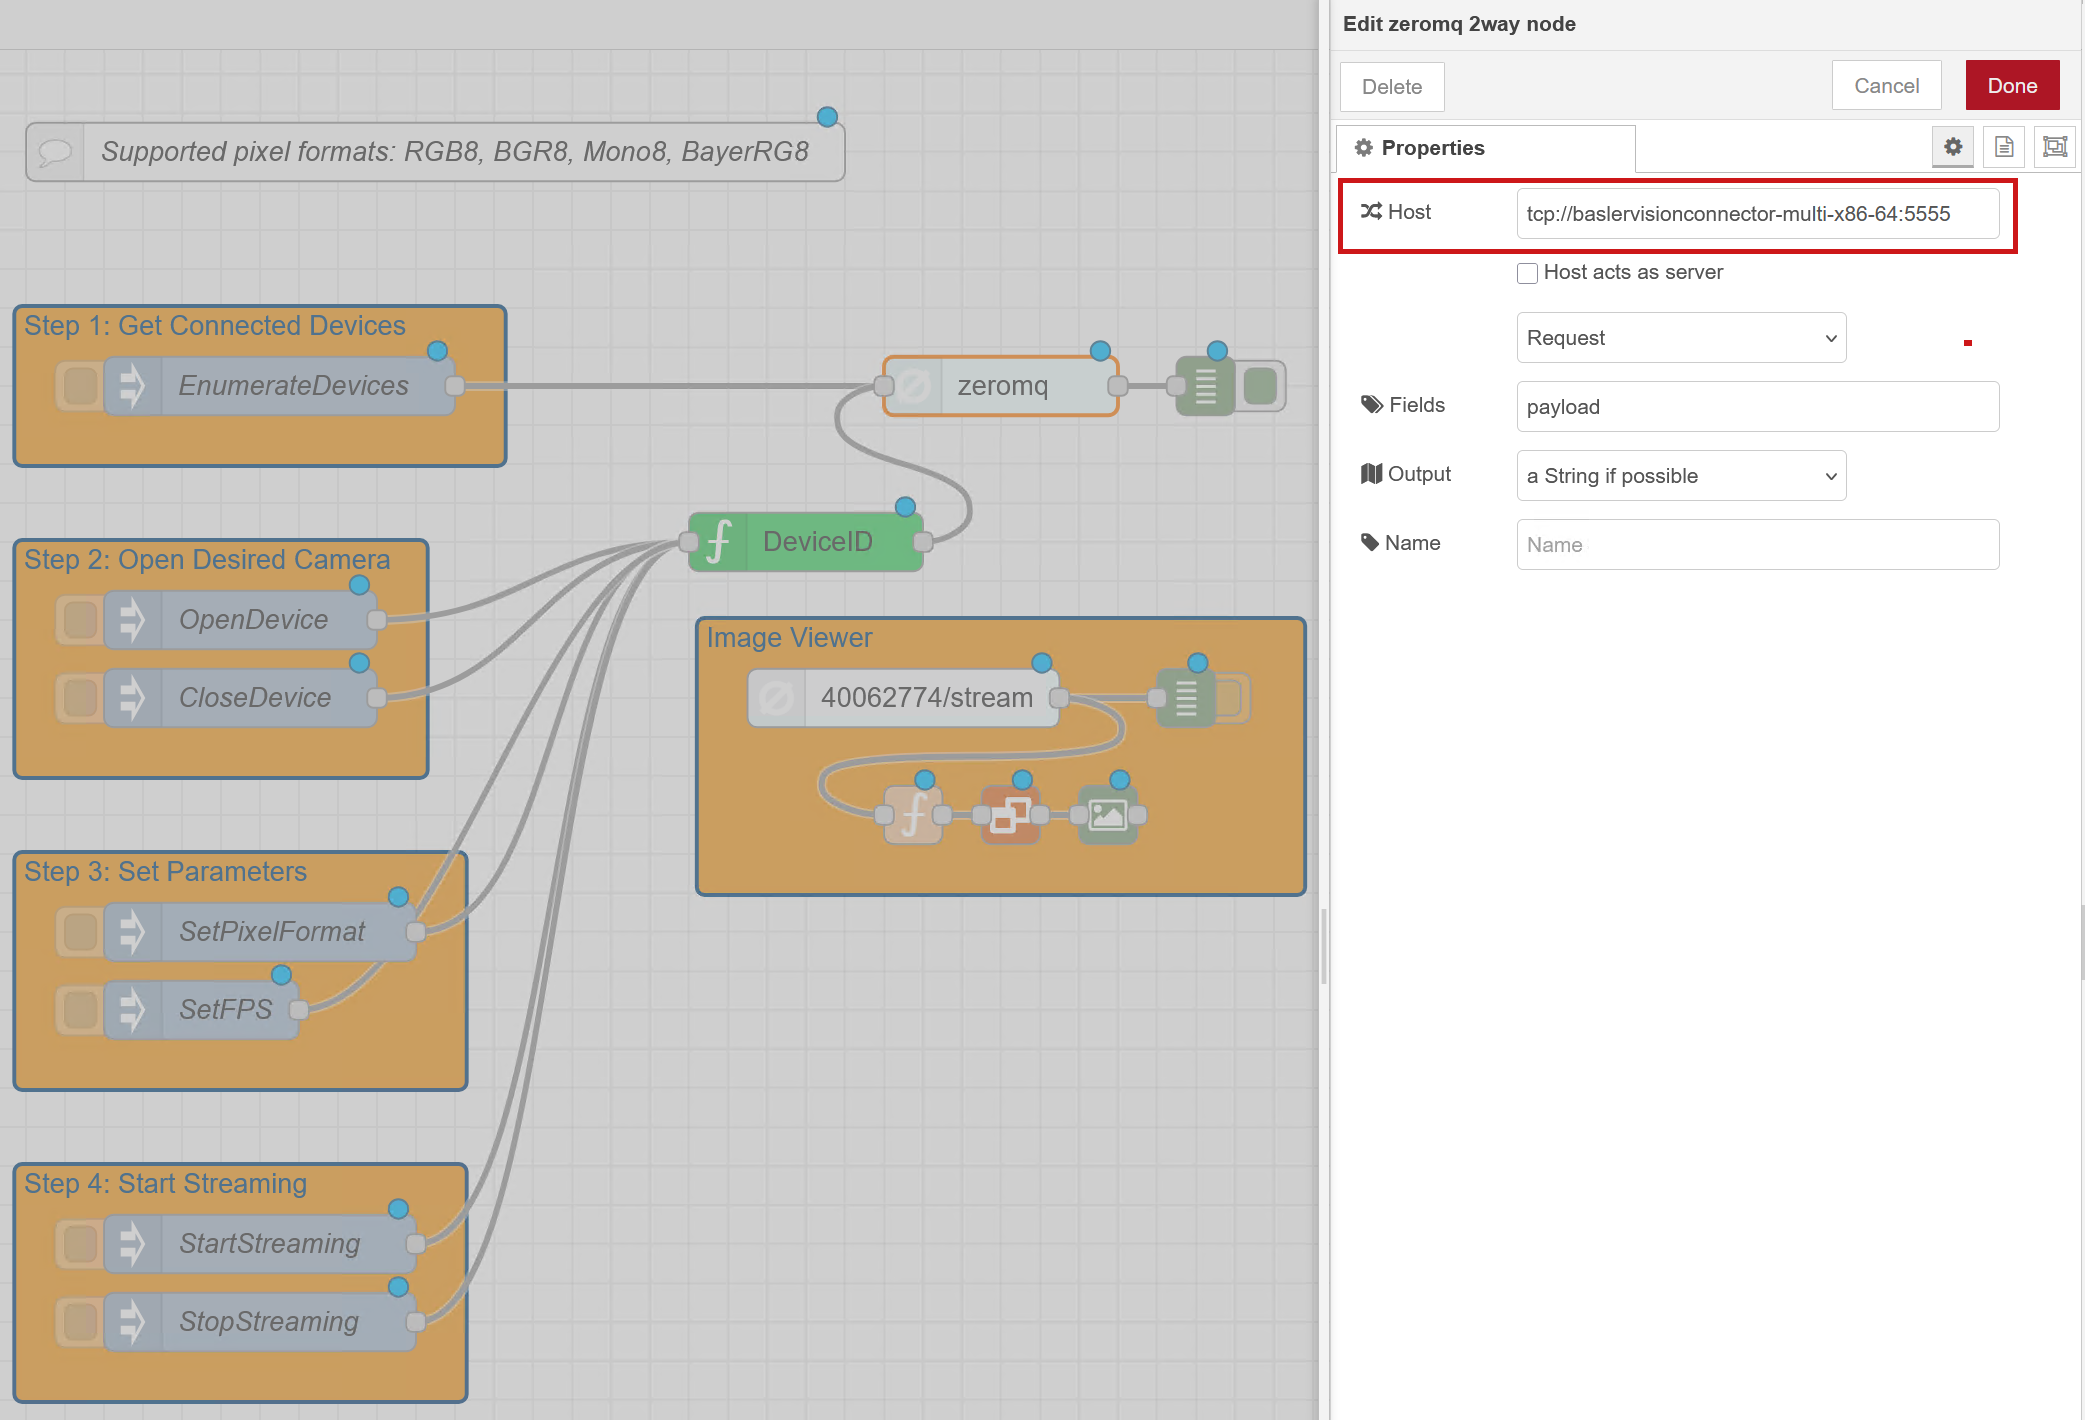
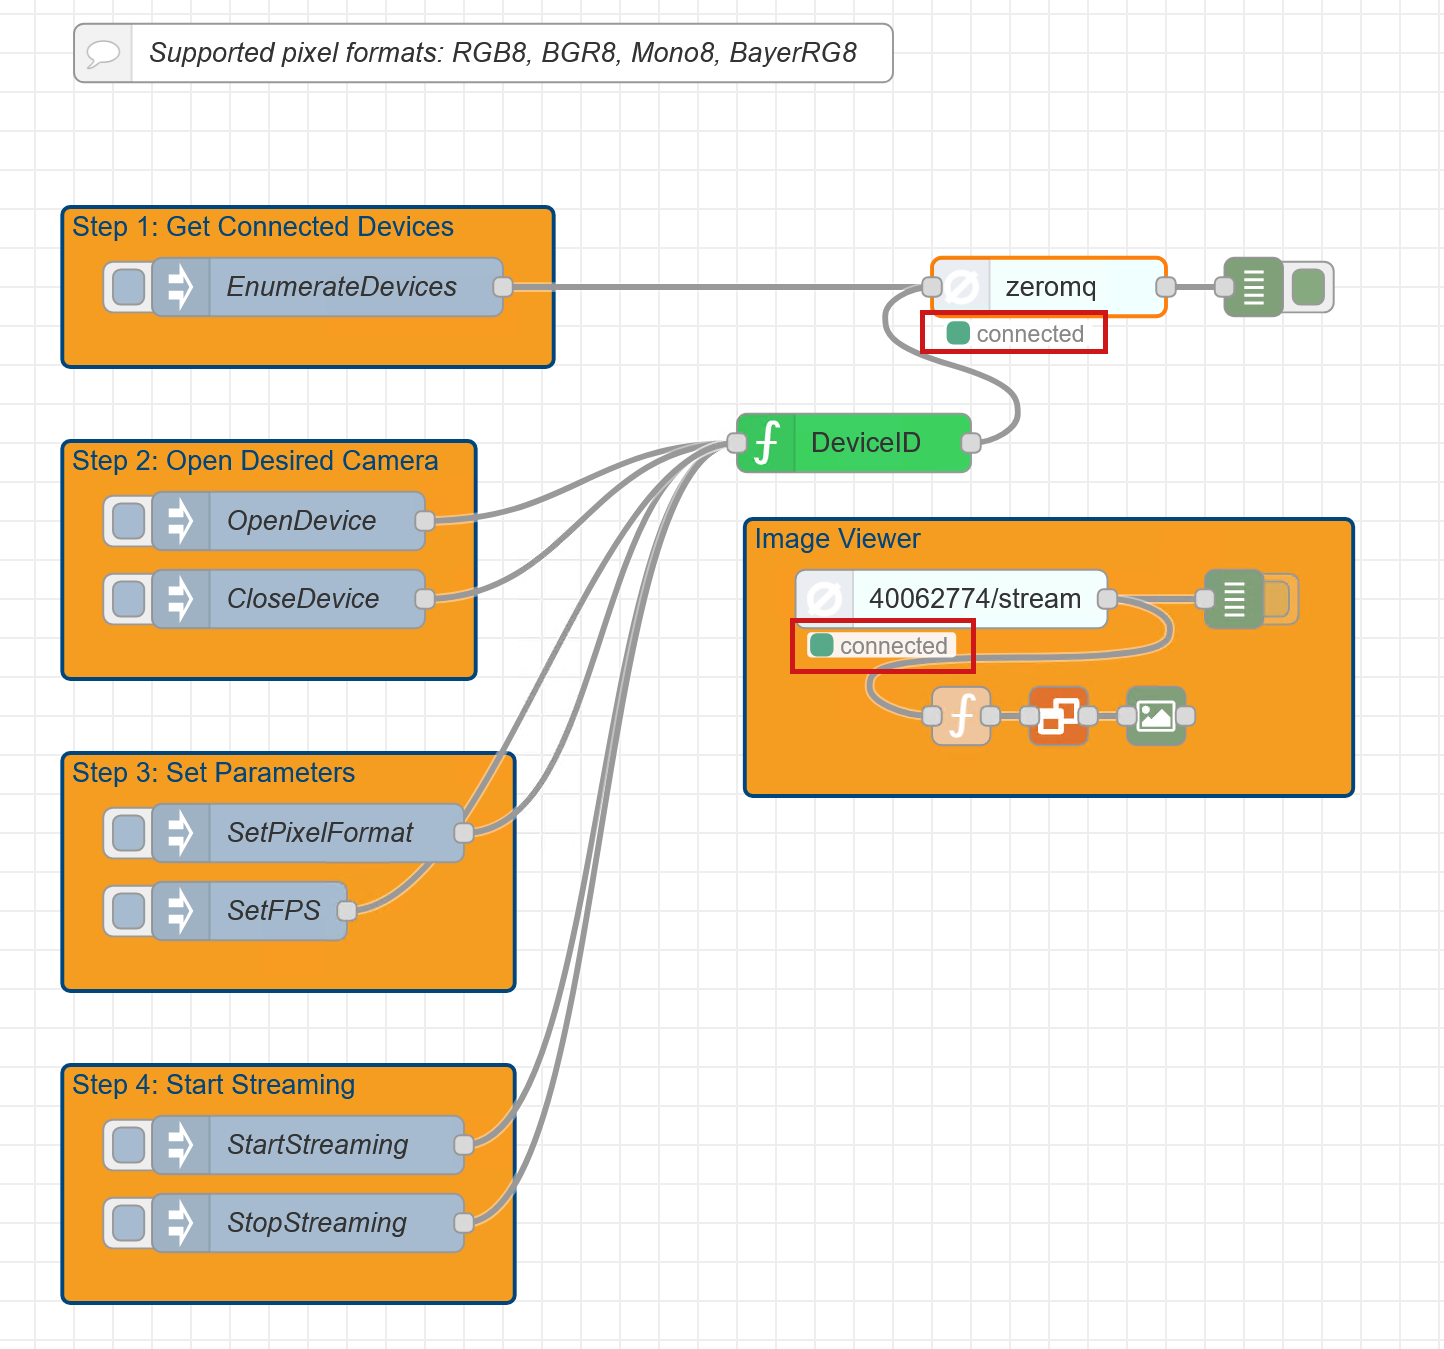
If the connection is established correctly, the topics zeromq and {DeviceID}/stream are shown as connected:
-
Click the Enumerate Devices node. All discovered devices are listed.
- Copy the device ID of the camera you want to stream with.
- Click the Device ID node. Paste the copied device ID here.
- Click the Pixel Formats node and set one of the supported pixel formats: Mono8, RGB8, BGR8, or Bayer RG8.
- If required, configure more parameters.
-
Click Start Streaming. A preview of your streamed image is displayed in the Flow Creator.
Next Steps#
In the previous steps you've installed the Basler Vision Connector and configured the IP address of your camera. The next steps are:
-
Setting up and configuring the accessories you use in your setup (e.g. lens type, illumination, etc.). To do this you can use the pylon Viewer or use the commands in the Messaging section.
Info
The pylon Basler pylon Viewer isn't included in the delivery of the Basler Vision Connector, but is part of the Basler pylon Software Suite.
-
Configuring the camera: For information about the camera features and how to use them, see the Feature documentation
- Configuring the image processing.
For information about the different apps and possibilities, e.g. AI Interference Server that can be used for further image processing, see the Siemens documentation "How to build your use case".