Getting Started (Smart blaze)#
For information about the initial setup and IP configuration of a Smart blaze camera, refer to the Camera Installation (blaze) topic.
Info
Throughout this documentation, replace ${cameraip} with the IP address you configured using the pylon IP Configurator. For convenience, you can add the following line to the ~/.bashrc file on your computer (replace the IP address with your actual IP address):
This allows you to copy and paste commands from this topic directly into your terminal without the need to modify them. Don't forget to reload your configuration after adding this line:
Camera Setup and IP Configuration#
Accessing the Smart blaze VM Web Interface#
The Smart blaze is shipped with a default virtual machine based on Debian Trixie.
You can control the VM and check its status using the Smart blaze VM Control web interface. To access the web interface, enter the following command in your terminal:
This should open your default web browser and display the Smart blaze VM Control Login web interface. Enter the default password to log in. The default password can be found on a label on the camera. For security reasons, Basler recommends changing the password after the initial login. Click the Change Password button in the web interface to do so.
After entering the current password, the Smart blaze VM Control web interface will be displayed:
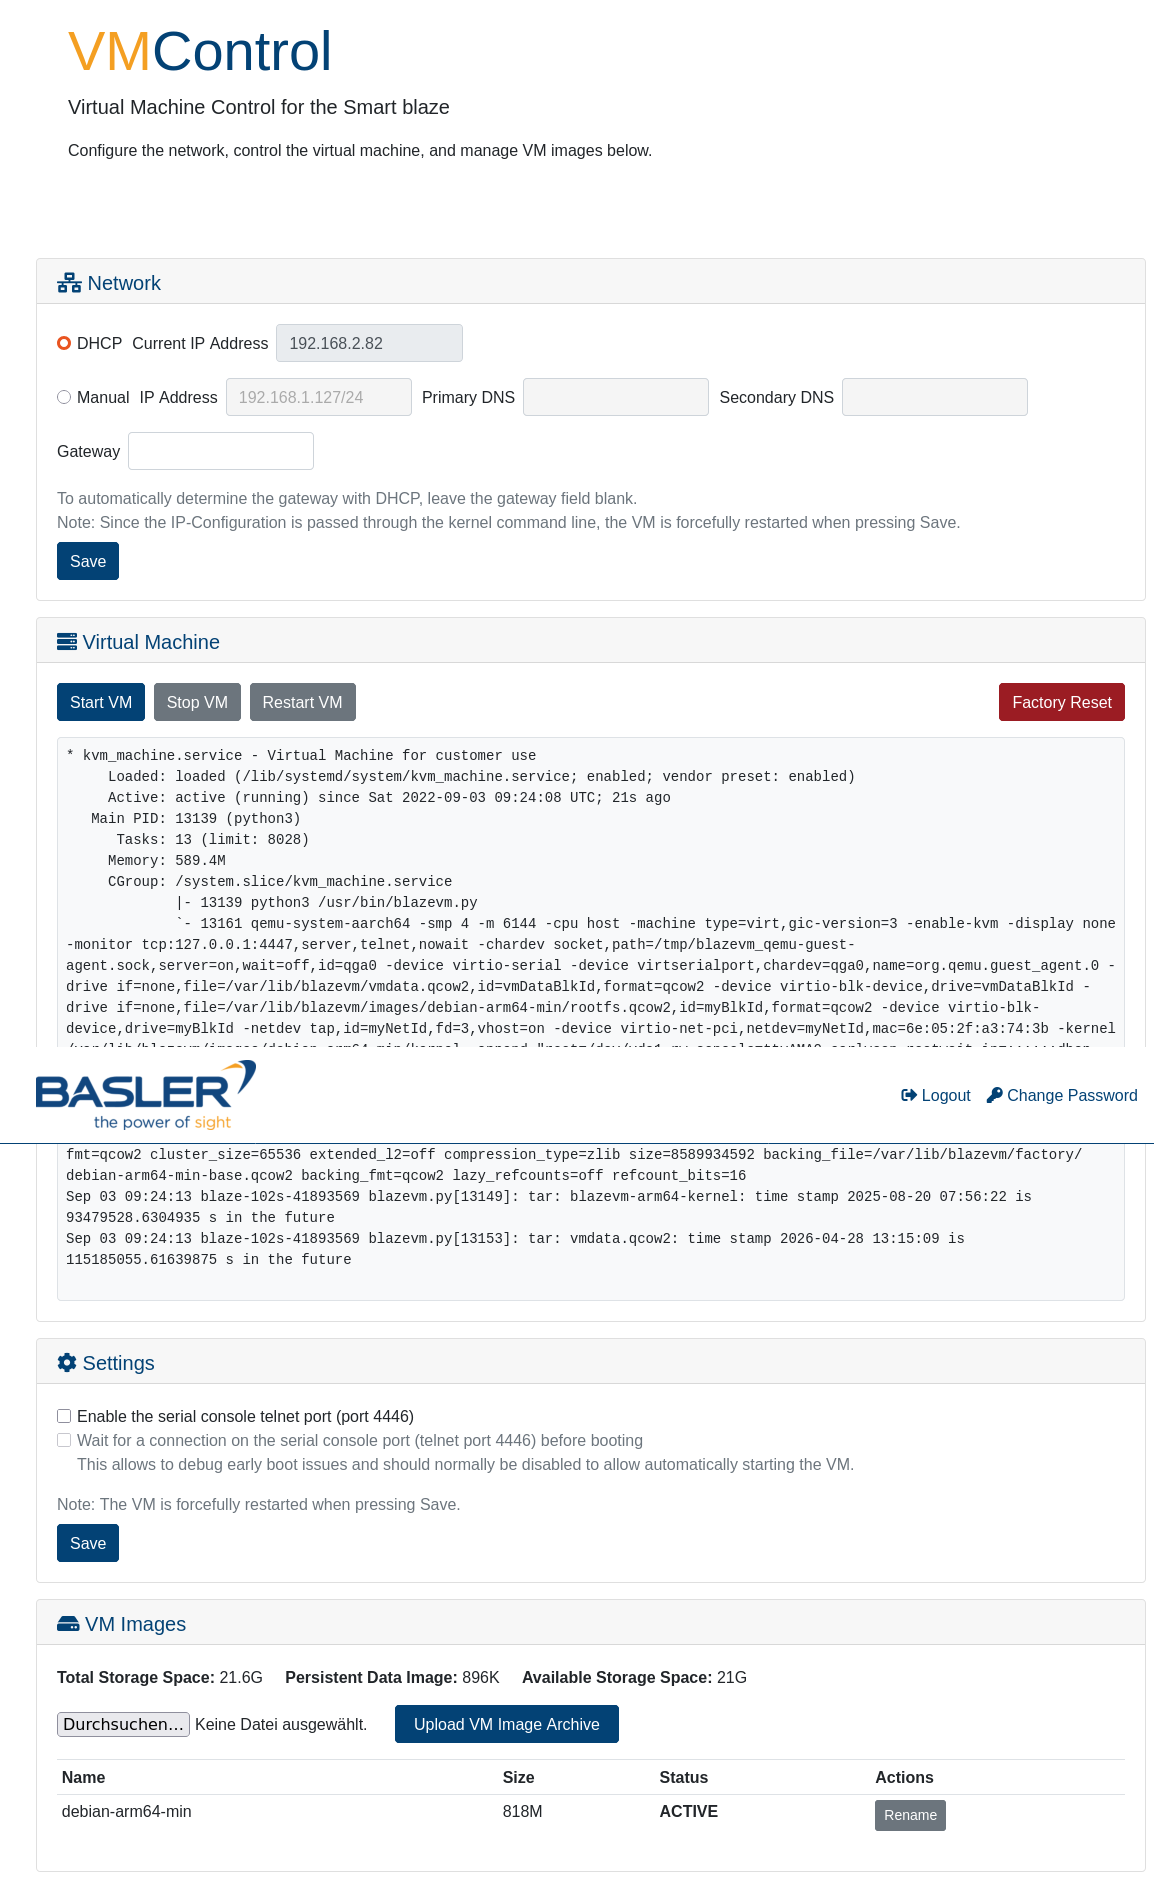
While the VM is running, the status information should indicate that the kvm_machine.service is loaded and active. The information area should include the string Active: active (running).
Before using the default VM for the first time, you have to manually confirm the start in a message dialog that pops up.
Assigning an IP Address to the VM#
By default, the VM tries to obtain an IP address via DHCP. If the camera is connected directly to your computer and no DHCP server is available, this will fail. In that case, use the Smart blaze VM Control web interface to configure a static IP address manually.
-
Use the following format when entering the IP address in the IP Address input field for manual IP address configuration:
a.b.c.d/maskbits
The trailing mask bits value defines the number of bits set in the subnet mask. Example:
When entering 192.168.1.127/24, the following configuration is applied to the VM:
IP address: 192.168.1.127
Subnet mask: 255.255.255.0 -
Enter the primary and secondary domain name servers (DNS) for manual IP configuration in the following format or leave them blank:
a.b.c.d - Enter the gateway in the following format or leave it blank:
a.b.c.d
If you leave the field blank, the gateway provided by DHCP is used. If you enter a value, that gateway is used for manual IP configuration.
Displaying the Current IP Address for DHCP Setup#
If you have a working DHCP setup, the VM automatically obtains an IP address from the DHCP server. To determine the IP address that was assigned, you have several options:
- Using the Smart blaze VM Control web interface (Recommended)
- Checking the router configuration
- Connecting to VM boot console via Telnet
Using the Smart blaze VM Control Web Interface (Recommended)#
If the qemu-guest-agent package is installed on the VM, the Smart blaze VM Control web interface can automatically display the current IP address of the VM. The qemu-guest-agent is a helper daemon that runs inside the guest VM and provides the host system with information about the guest VM, including the network configuration.
Info
If the qemu-guest-agent is installed and running on the VM, the IP address can be displayed by the Smart blaze VM Control web interface. If the agent isn't installed, the web interface can retrieve the VM's current IP address only when the VM communicates with the blaze host system via the network.
The qemu-guest-agent package is configured to be installed during the VM build process. This is specified in the blazevm.xml file. This file is available in the default install directory: /opt/pylon/share/pylon/Samples/blaze/smartblaze/vm/elbe/blazevm.xml
If you are building a custom VM image, ensure that qemu-guest-agent is included in the package list in the configuration file.
After the agent has been installed and started, the Smart blaze VM Control web interface automatically displays the VM's current IP address in the status information area.
Checking the Router Configuration#
Another way to find out which IP address has been assigned to the VM is to check your router's DHCP client list or configuration interface.
Connecting to VM Boot Console via Telnet#
If qemu-guest-agent is not installed or if you prefer direct access, connect to the VM's boot console. To enable this, ensure the check box Enable the serial console telnet port is selected in the web interface. Afterwards, you can access the console via Telnet:
Log in with the user name root and the password printed on the camera label. Inspect the IP address by entering the following command:
The output should look similar to this (the actual IP address will differ):
1: lo: <LOOPBACK,UP,LOWER_UP> mtu 65536 qdisc noqueue state UNKNOWN group default qlen 1000
    link/loopback 00:00:00:00:00:00 brd 00:00:00:00:00:00
    inet 127.0.0.1/8 scope host lo
       valid_lft forever preferred_lft forever
2: eth0: <BROADCAST,MULTICAST,UP,LOWER_UP> mtu 1500 qdisc pfifo_fast state UP group default qlen 1000
    link/ether 3e:41:20:7e:d2:ba brd ff:ff:ff:ff:ff:ff
    inet 192.168.1.127/24 brd 192.168.1.255 scope global eth0
       valid_lft forever preferred_lft forever
Connecting to the VM via SSH#
Info
Similar to the ${cameraip} variable, ${vmip} will be used throughout this documentation to refer to the IP address of the VM running on the camera. Add the following line to your ~/.bashrc file for convenience (adjust the IP address accordingly):
Once you have obtained the IP address of the VM, you can connect to it via SSH using the user name root and the password printed on the camera label:
You can run the htop command to see what is running inside the virtual machine:
$ htop
    0[|                                   0.7%] Tasks: 15, 2 thr, 66 kthr; 1 running
    1[|                                   0.6%] Load average: 0.00 0.00 0.00
    2[|                                   2.0%] Uptime: 17:37:58
    3[|                                   0.6%]
  Mem[|||||||                      71.5M/5.79G]
  Swp[                                   0K/0K]

  [Main] [I/O]
    PID USER       PRI  NI  VIRT   RES   SHR S  CPU%-MEM%   TIME+  Command
    643 root        20   0  4740  3156  2428 R   2.6  0.1  0:00.16 htop -M
      1 root        20   0  164M 11032  8308 S   0.0  0.2  1:06.60 /sbin/init
    141 root        20   0 33368 10308  9300 S   0.0  0.2  0:01.34 /lib/systemd/systemd-journal
    162 root        20   0 24824  5752  4108 S   0.0  0.1  0:01.34 /lib/systemd/systemd-udevd
    163 systemd-ti  20   0 90448  6804  5924 S   0.0  0.1  1:44.70 /lib/systemd/systemd-timesyn
    179 systemd-ti  20   0 90448  6804  5924 S   0.0  0.1  0:58.75 /lib/systemd/systemd-timesyn
    193 avahi       20   0  7224  3172  2820 S   0.0  0.1  0:00.13 avahi-daemon: running [Blaze
    194 messagebus  20   0  8304  3436  3000 S   0.0  0.1  0:00.24 /usr/bin/dbus-daemon --syste
    198 root        20   0 16876  6852  5940 S   0.0  0.1  0:01.25 /lib/systemd/systemd-logind
    200 avahi       20   0  7116   308     0 S   0.0  0.0  0:00.00 avahi-daemon: chroot helper
    203 root        20   0  2640   764   688 S   0.0  0.0  0:00.00 /sbin/agetty -o -p -- \u --n
    205 root        20   0  2684   812   736 S   0.0  0.0  0:00.01 /sbin/agetty -o -p -- \u --k
    208 root        20   0 16280  8776  7488 S   0.0  0.1  0:00.09 sshd: /usr/sbin/sshd -D [lis
F1Help  F2Setup F3SearchF4FilterF5Tree  F6SortByF7Nice -F8Nice +F9Kill  F10Quit
For more secure and convenient access, set up a key pair for authentication. If you haven't yet created a key in ~/.ssh/id_rsa on your computer, you can create a key pair with these steps:
-
Run the following command and confirm all prompts:
-
Copy your public key to the VM.
You have to confirm with the root password one last time.
Now, you can connect to your VM from this machine without having to enter a password every time.
Using this authentication, you can also transfer files to the VM using the scp tool. A more efficient alternative is the rsync utility, which is already installed on the VM.
Developing Software for the Smart blaze VM#
To develop software for the Smart blaze VM, the Smart blaze SDK offers two cross-development environment options:
- ELBE SDK: ELBE (Embedded Linux Build Environment) contains the cross-development toolchain and all required development packages according to the target root file system.
- Docker container: Contains the cross-development toolchain and all required packages.
Building blaze C++ Samples#
The pylon Supplementary Package for blaze includes several C++ samples demonstrating how to control the camera using the Basler pylon SDK.
If you haven't done so already, install the latest pylon SDK and the pylon Supplementary Package for blaze for Linux on your development computer. You can obtain these packages from the Basler website.
You can choose between the following build environments:
Building Samples Using ELBE SDK#
If you haven't done so already, create and install the ELBE SDK as described under Cross-Building Using ELBE SDK.
To build the samples and copy them to the camera VM, run the following commands:
cp -r /opt/pylon/share/pylon/Samples/blaze/cpp ./blaze_samples
cd blaze_samples
. /opt/elbe-sdk-aarch64-linux-gnu-BlazeVM-1.2/environment-setup-elbe-aarch64-linux-gnu-BlazeVM-1.2
# Adjust the path for the CMake toolchain file from the Smart blaze SDK as needed.
export CMAKE_TOOLCHAIN_FILE=/opt/pylon/share/pylon/Samples/blaze/smartblaze/vm/elbe/cross-toolchain.cmake
cmake -B build .
cmake --build build -j$(nproc)
ssh root@${vmip} mkdir -p samples
scp $(find build/ -type f -executable | egrep -w -v "ColorAndDepth|CMakeFiles") root@${vmip}:samples
Building Samples Using Docker Container#
If you haven't done so already, create the dockerDo alias as described under Running Commands in the Docker Container.
To build the samples and copy them to the camera VM, run the following commands. The container already defines the environment variable CMAKE_TOOLCHAIN_FILE, which instructs CMake to use the ARM64 cross-compiler toolchain.
dockerDo cp -r /opt/pylon/share/pylon/Samples/blaze/cpp ./blaze_samples
cd blaze_samples
dockerDo cmake -B build .
dockerDo cmake --build build -j$(nproc)
ssh root@${vmip} mkdir -p samples
scp $(find build/ -type f -executable | egrep -w -v "ColorAndDepth|CMakeFiles") root@${vmip}:samples
Running blaze C++ Samples#
The first sample simply opens the first blaze camera it finds, captures 10 frames, and prints some pixel values. To run the sample:
-
Open an SSH shell to the VM:
-
Inside that shell, start the sample.
You should see output similar to the following:root@BlazeCustomerVM:~# ./samples/FirstSample Connected to camera Basler blaze-102S (40560199) User-defined name: Serial Number: 40560199 x= 11.9 y= 27.4 z=1753.7 intensity=51091 confidence=25577 x= 11.9 y= 27.4 z=1754.9 intensity=51006 confidence=25471 x= 11.9 y= 27.4 z=1755.7 intensity=51011 confidence=25478 x= 11.9 y= 27.4 z=1756.5 intensity=50728 confidence=25126 x= 11.9 y= 27.4 z=1757.1 intensity=50965 confidence=25420 x= 11.9 y= 27.5 z=1757.7 intensity=50963 confidence=25417 x= 11.9 y= 27.5 z=1758.3 intensity=50963 confidence=25417 x= 11.9 y= 27.5 z=1758.9 intensity=50859 confidence=25289 x= 11.9 y= 27.5 z=1759.5 intensity=50820 confidence=25240 x= 11.9 y= 27.5 z=1760.1 intensity=50803 confidence=25219 Press Enter to exit.
To run the sample directly, without opening an interactive SSH shell, you must set the GENICAM_GENTL64_PATH environment variable:
Network Forwarding#
If you connect the camera directly to your computer, the VM on the camera won't have an internet connection. If you require internet access in the VM (for example, to install additional packages from the Debian archives using apt-get), you need to configure NAT forwarding rules on your computer:
function setIptables() {
    echo "iptables: $@"
    if ! sudo iptables -C "$@"; then
        sudo iptables -A "$@";
    fi
}
DEVICE_WITH_CAMERA=eth0   # The network device on your PC to which the camera is connected
DEVICE_WITH_INTERNET=eth1 # The network device on your PC which provides the internet connection
OWN_IP=192.168.1.2        # Your PC's IP address on $DEVICE_WITH_CAMERA
VM_NET_PREFIX=24

setIptables FORWARD -s ${vmip} -o $DEVICE_WITH_INTERNET -i $DEVICE_WITH_CAMERA -j ACCEPT
setIptables FORWARD -i $DEVICE_WITH_INTERNET -d ${vmip} -m state --state RELATED,ESTABLISHED -j ACCEPT
setIptables POSTROUTING -t nat -o $DEVICE_WITH_INTERNET -j MASQUERADE

ssh root@${vmip} ip r add default via $OWN_IP dev eth0
ssh root@${vmip} bash -c "'echo nameserver 8.8.8.8 >> /etc/resolv.conf'"
With these settings in place, you should be able to install additional packages:
ssh root@${vmip} apt-get update
ssh root@${vmip} apt-get install chocolate-doom
ssh -X root@${vmip} /usr/games/chocolate-doom
X11 Forwarding#
Some programming samples display images captured by the camera using the OpenCV visualization window. Visualizing captured or processed images during development is very helpful. This can be achieved through X11 forwarding at the cost of reduced performance. X11 forwarding allows an application running on the virtual machine to display its graphical user interface on your local machine's display.
To enable X11 forwarding:
-
Use the
-Xor-Yoption when connecting via SSH: -
Start a sample that opens image windows:
You should see a window open on your PC showing the grayscale depth image from the camera.
Info
You may see errors in the terminal similar to the following:
This is because X11 forwarding takes additional time, slowing down the grab loop and resulting in missed frames. This can be avoided by configuring a lower frame rate.
To learn how to reduce the frame rate, see Controlling the Frame Rate.
Another mode of operation, which works without risking frame drops even during X11 forwarding, is to use the software trigger feature so that the next frame is triggered only after processing of the current frame has finished. This results in a lower frame rate because the application waits before requesting the next frame.
Running blaze Python Samples#
The Python samples use OpenCV or Open3D. To run the Python samples:
-
Open an SSH shell with X11 forwarding:
-
Inside that shell, change to the sample directory:
-
Run a sample. You should see output and an OpenCV or Open3D visualization window similar to the following:
Using device  blaze-102S
OperatingMode:  LongRange
FastMode:  False
FilterSpatial:  True
FilterTemporal:  True
FilterStrength:  220
OutlierRemoval:  True
ConfidenceThreshold:  320
GammaCorrection:  True
Min. Depth [mm]:  0
Max. Depth [mm]:  9990
To exit, press ESC in one of the image windows
$ python3 ShowPointCloud/show_point_cloud.py Using device blaze-102S [Open3D DEBUG] GLFW init. To exit, press ESC in one of the image windows. To save a point cloud as .pcd file, press S in one of the image windows. [Open3D DEBUG] Add geometry and update bounding box to [(-1565.8367, -1279.5530, 0.0000) - (1694.7946, 50.7543, 2803.0823)] [Open3D DEBUG] Global colormap init.