HDR (pylon Viewer)#
HDR improves the brightness and contrast of an image by using more than one exposure time. This feature complements the HDR camera feature.
The modes available in the pylon Viewer depend on your camera model. Check the HDR topic to find out whether your camera supports HDR and which modes are available.
How It Works#
Dynamic range is the ratio between the longest and the shortest exposure time and therefore defines the range of brightness levels that can be displayed. It is measured in decibels (dB). A larger difference between the exposure times produces a higher value, allowing you to see details in images more clearly.
Depending on the camera model, different HDR modes are available:
- Off: The camera uses a single exposure time.
- HDR Beyond: Two exposure times are used on neighboring pixels. The camera combines the pixels into one HDR image in real time.
- Interleaved HDR (iHDR): Two exposure times are used on alternating sensor lines. An external post-processing program is necessary to combine the lines into an HDR image.
- Quad HDR (QHDR): Four exposure times are used for each 2×2 pixel unit. An external post-processing program is necessary to combine the pixels into an HDR image.
- HDR via Sequencer: Three consecutive images are acquired with different exposure times. An external post-processing program is necessary to combine the images into an HDR image.
One mode is active at a time. Selecting a mode turns the other modes off and writes the corresponding settings to the camera.
Settings that you change for HDR Beyond, Interleaved HDR (iHDR), and Quad HDR (QHDR) are applied immediately. For HDR via Sequencer, the exposure times are written to the camera when you click Apply.
If you load camera settings from a .pfs file, the HDR mode drop-down list shows the mode contained in that file.
Configuring HDR#
To configure HDR image acquisition:
- Open the High Dynamic Range pane by clicking Window > High Dynamic Range.
To close the pane, click the same menu item again. - Select an open camera in the Devices pane or open the camera on which you want to configure HDR image acquisition.
If the open camera doesn't support HDR, a message is displayed that tells you so. - Stop image acquisition. Otherwise, the HDR mode drop-down list is unavailable.
- Select an HDR mode and configure its settings as described in the following sections.
- To turn HDR off, in the HDR mode drop-down list, select Off.
The camera uses a single exposure time again. If HDR was using the sequencer, the sequencer is turned off as well.
HDR Beyond#
In HDR Beyond mode, neighboring pixels are exposed for two different times, arranged in a checkerboard pattern. Both exposures end at the same time. The camera combines the pixels into one HDR image in real time.
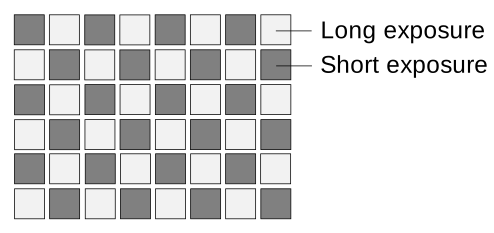
To configure HDR Beyond:
- In the HDR mode drop-down list, select HDR Beyond.
- In the Pixel format drop-down list, select the desired pixel format.
- Specify the Long exposure time to the longer of the two exposure times by entering a value or using the slider.
- Specify the HDR Beyond ratio.
The camera divides the long exposure time by this ratio. The result is shown next to Short exposure time and marked as (resulting).
The Dynamic range value at the bottom of the pane updates when you change the long exposure time or the ratio.
Info
- The allowed range of HDR Beyond ratio depends on your camera model. For the parameter limits and for optional noise reduction and sharpness settings, see HDR Beyond.
- If the Reverse X or Reverse Y feature or both are enabled, the pixel positions shown in the drawing change accordingly.
Interleaved HDR (iHDR)#
In interleaved HDR mode, alternating sensor lines are exposed for different times. The exposures start at the same time, which produces an image with bright and dark lines.
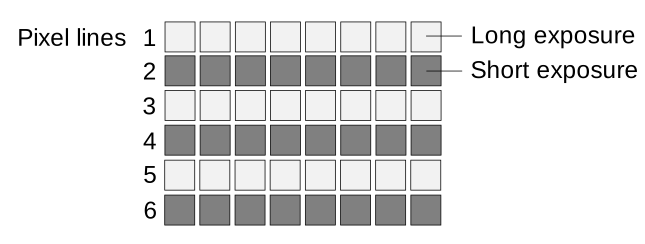
To configure interleaved HDR:
- In the HDR mode drop-down list, select Interleaved HDR (iHDR).
- Specify the exposure times by entering a value or using the slider.
- Odd pixel lines (1): Lines 1, 3, 5, and so on.
- Even pixel lines (2): Lines 2, 4, 6, and so on.
The Dynamic range value at the bottom of the pane updates when you change either exposure time.
Use an external post-processing program to combine the bright and dark lines into an HDR image. For more information, see Interleaved HDR.
Info
If the Reverse Y feature is enabled, the line positions shown in the drawing change accordingly.
Quad HDR (QHDR)#
In Quad HDR mode, the sensor is divided into 2×2 pixel units allowing you to specify four different exposure times. The exposures end at the same time.
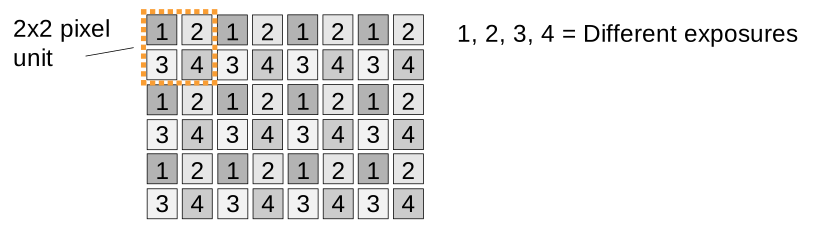
The numbers in the drawing correspond to the exposure time input fields:
- Top-left (1)
- Top-right (2)
- Bottom-left (3)
- Bottom-right (4)
To configure Quad HDR:
- In the HDR mode drop-down list, select Quad HDR (QHDR).
- Specify the exposure time for each pixel in the 2×2 pixel unit by entering a value or using the slider.
The Dynamic range value at the bottom of the pane updates when you change either exposure time.
Use an external post-processing program to combine the pixels of each 2×2 unit into an HDR image. For more information, see Quad HDR.
Info
If the Reverse X or Reverse Y feature or both are enabled, the pixel positions shown in the drawing change accordingly.
HDR via Sequencer#
In HDR via Sequencer mode, you can configure three sequencer sets. During image acquisition, the camera cycles through these sets and acquires three consecutive images.
The illustration in the High Dynamic Range pane shows the recommended order. Use the shortest exposure time for the 1st image and the longest exposure time for the 3rd image.
To configure HDR via sequencer:
- In the HDR mode drop-down list, select HDR via Sequencer.
The sequencer is prepared for configuration (SequencerConfigurationModeparameter is set toOnand other parameters become available in the Features pane). - If Enable sequencer is turned on, turn it off.
The exposure time input fields and the Apply button are only available while the sequencer is turned off. - Specify the exposure times for 1st image, 2nd image, and 3rd image by entering a value or using the slider.
These values are applied to the camera when you click Apply. - Click Apply.
The three exposure times are stored in the first three sequencer sets. Settings already stored in these sets are replaced.
If the exposure times have been applied, a confirmation is displayed. - Turn Enable sequencer on.
The camera uses the three sequencer sets during image acquisition. After the third image is taken, the sequencer returns to the first set.
To change the exposure times again, turn Enable sequencer off, edit the values, click Apply, and turn Enable sequencer on again.
The Dynamic range value at the bottom of the pane updates when you change either exposure time.
If the exposure times can't be applied, a message is displayed. If that happens, check the Message Log pane. Details of what went wrong are displayed there.
Use an external post-processing program to combine the three images into an HDR image.
- For detailed information about the sequencer, see the Sequencer topic. The implementation of the Sequencer feature varies by camera interface.
- See also How to: HDR Imaging with Basler Cameras Using Sequencer Mode and PyPylon.
- See also OpenCV - High Dynamic Range (HDR).